Filter
The Filter web action enables you to filter the records in a banded object, table or crosstab.
To bind the Filter web action to a web control:
- Insert the required web control into your report by dragging it from the Toolbox panel.
- Right-click the web control, and then select Display Type from the shortcut menu.
- In the Web Behaviors box of the Display Type dialog, choose an event from the Events column, then click in the Actions column and click
 that appears in the text box.
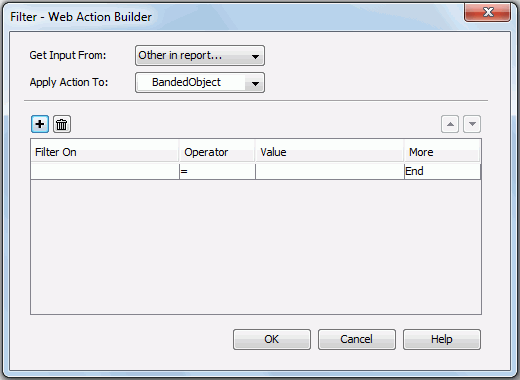
- In the Web Action List dialog, select Filter and click OK. The Filter - Web Action Builder dialog appears. See the dialog.
- From the Get Input From drop-down list, specify where to get the web control, which may be a form, or other in report.
- From the Apply Action To drop-down list, select a component whose records will be filtered.
- In the Filter On column, specify the field on which to filter the records. The field may be a column in the component, or be specified by the value of a web control.
- Specify the operator and value. The value may be input by yourself, or be the value of a web control.
- If necessary, specify And or Or in the More column so as to add a new filter condition or you can click
 to add a new filter condition.
To delete a filter condition, select it and click  . To adjust the order of the filter conditions, click
  or
or  .
.
- Click OK to accept the settings.
See also Filter - Web Action Builder dialog for details about options in the dialog.
Besides the way of binding the Filter web action to a web control, two standalone web controls can achieve the same purpose: slider and filter control which are used to filter specified data components in a report. For details about the usage of the web controls, see Using slider or filter control to filter data.