Adding tables to a web service connection
After setting up the WSDL connection, all the information of the web service defined in the WSDL file will be stored in the catalog, including information of service, operation, and the input message and output message in each operation. You can add tables to a web service connection based on these information. However, you can only define tables based on operations which support SOAP binding. Queries can be built on these tables and a report is developed from a query.
To add tables to a web service connection:
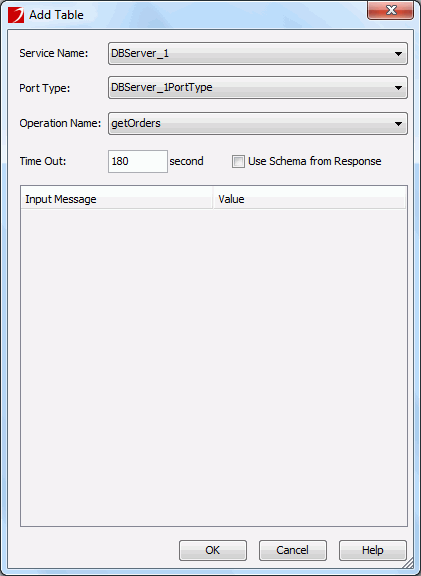
- Select the Tables node of the web service connection, right-click it and then on the shortcut menu, click Add Table. The Add Table dialog appears. See the dialog.
- Specify a service from the Service Name drop-down list.
- If you use WSDL 1.1 to define the web service, you also need to specify the port type for the selected service from the Port Type drop-down list.
- All the operations with SOAP binding included in the selected service will be listed in the Operation Name drop-down list. Select one as required. Then the input message of the operation will be displayed, you can define the value for it if necessary.
If the Input Message column is empty, that is to say, the input message has its own defined values, there is no need for you to provide it the value.
- In the Value column, type in the value in the text field, or define a constant level formula or parameter to be the value of the input message.
- Type the number of seconds in the Time Out text field to specify how long to wait to get the specified service and operation information defined in the WSDL file.
- If you use WSDL 1.1, you may sometimes find that the XML schema described by the output message does not match the concrete XML instance in the SOAP responded from the web service, as a result, JReport will be unable to read data properly from that XML instance. In this condition, you can check the option Use Schema from Response, so as to ignore the XML schema in the output message and directly parse the XML schema from the specific XML instance included in the SOAP responded from web service.
- When done, click the OK button to accept the changes and exit the dialog.
By default, when you add a table, you add all the columns JReport finds in the table. However, JReport gives you the flexibility to remove columns in a table, leaving only the columns useful to your reports. To remove a column from a table, right-click the column and select Delete from the shortcut menu.
Also, you can add the columns back to a table after you have removed them. To do this:
- Right-click the table to which you want to insert columns, then select Insert Column from the shortcut menu.
- In the Add Column dialog, select the required columns from the Columns box.
There will be no available columns in the Columns box if you do not delete any in the table first since all columns are added automatically to start.
- Click the Done button to add the columns to the table.