
Setting up an XML connection
To set up an XML connection to connect a JReport catalog to an XML data source, follow the steps below:
- Create a catalog which contains a default data source, then in the Data tab of the Catalog Browser, expand the node of the data source, right-click the Relational node and choose Add XML Connection from the shortcut menu.
If you want to set up the connection by adding a data source to an existing catalog and then defining the connection on the data source, open the catalog, select any data source contained in it, click the New Data Source button  on the Catalog Browser toolbar, then in the New Data source dialog, specify the name of the data source, select the XML connection type and click OK.
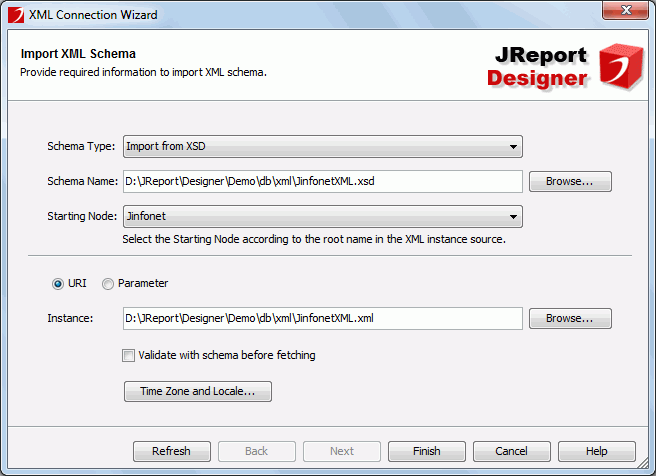
- In the Import XML Schema screen of the XML Connection Wizard, provide the required information for importing an XML schema. See the screen.

- If Import from XSD is selected from the Schema Type drop-down list,
- Click the Browse button next to the Schema Name text field to specify the schema file.
- From the Starting Node drop-down list, specify the starting node accordingly.
- Specify the XML instance file. You can specify the file directly or use a parameter to do this at runtime.
To specify the file directly, check the URI radio button, and click Browse to specify the instance file. To use a parameter to specify the file at runtime, check the Parameter radio button and then select the parameter from the Instance drop-down list or click  to create one.
- Check the Validate with schema before fetching to validate whether or not values in the XML instance is valid according to the W3C standard and the selected XSD schema.
- Click the Time Zone and Locale button to specify the time zone and the locale as required.
- If Parse from XML Instance is selected from the Schema Type drop-down list, specify the instance file and time zone and the locale as required.
When done, click Next to go to the next screen.
- In the Modify Schema Properties screen, supplement and modify the element properties as required and then click Next.
- In the Transform XML Schema screen, select an XPath to be the transforming start point, and then click Next.
- In the Transformed Relational Schema screen, check the transformed result, and then click Next.
- In the Add Table screen, add the required tables to the connection, and check the Generate the default pre-join path checkbox for generating default pre-join paths for tables of the XML data source.
- Click Finish to confirm the transformed result and finalize the transformation process.
See also XML Connection Wizard for additional help about options in the wizard.


 on the Catalog Browser toolbar, then in the New Data source dialog, specify the name of the data source, select the XML connection type and click OK.
  to create one.