Exporting the report results to a CSV file
When exporting the results of a report tab in a page report to a CSV file, you can set the property Columned to decide whether to export the results to a general CSV file or a columned CSV file. If you set the property to false, the report tab will be exported to a general CSV file. If you want to export the report tab to a columned CSV file, set the property to true.
The following is an example about exporting a page report tab to a general CSV file:
- In JReport Designer, open the page report that contains the report tab you want to export.
- On the report tab bar, click the report tab.
- In the Report Inspector, select the root node that represents the report tab and set the property Columned to false.
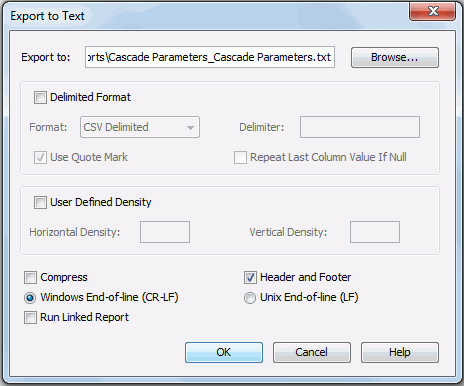
- Click File > Export To > Text to bring up the Export to Text dialog. See the dialog.
- Specify the destination of the exported file as required.
- Check Delimited Format checkbox, and then select CSV Delimited from the Format drop-down list.
- To enable records to be aligned well in the exported file, you are recommended to check Use Quote Mark. Otherwise, the commas in data values such as $78,321.00 will conflict with the delimiter (comma), and may potentially cause the data to be separated incorrectly when the exported file is further processed by other applications. The following shows an example:
Scarsdale,The Java King,(914) 657-9823,(914) 657-8745,$78,321.00
As shown above, it is difficult to determine whether the value is $78321.00 or $78 and 321.00.
- Check Run Linked Report if you want to include the linked reports in the exported Text result.
- Click OK to start exporting.
See also Export to Text dialog for details about options in the dialog.
When exporting a page report tab to a CSV file, you may want to export only some of the objects in the report tab instead of the whole report tab. To achieve this, you can do it as follows:
- In the Report Inspector, select the node that represents the object you want to export to the result file.
- Set the property Export to CSV of this object to true.
- Repeat the above steps to specify other objects that you want to export.
- Set this property to false for all the other objects that you do not want to export.
- Click File > Export To > Text.
- In the Export to Text dialog, specify the directory and name of the exported file.
- Make sure that you have checked the Delimited Format box, and selected CSV Delimited format.
- Check Run Linked Report if you want to include the linked reports in the exported Text result.
- Click OK to start exporting.
Then, the exported file will only contain objects whose Export to CSV property value has been set to true. Note that if you set the Export to CSV property of an object to false, all the object's children will not be exported regardless of their individual Export to CSV properties.
Notes:
- No matter the report tab is exported to a general CSV file or a columned CSV file,
- The data of each field should be in one column. If there is no data in a column, empty strings (" ") will be placed there automatically. In which case, the empty strings cannot be compressed. Only if there is no data in the entire line, can a row be compressed when you check the Compress option.
- In the Export to Text dialog, if you select Custom Delimited, you should export the report tab to a .txt file instead of a .csv file. Then, open the exported file with Excel, and the Text Import wizard will be displayed. In this wizard, check the Delimited radio button, click Next, check Other on the Delimiters panel and key in the delimiter you specify in the Export to Text dialog, and then click Finish to view the results.
- When you specify to export a report tab to a general CSV file,
- Objects in the exported file will be located according to its dimension values (x, y, width, height) you set in the Report Inspector.
- In the exported file, you may find that some column names are not aligned with their DBFields, so they may be displayed in different columns. To resolve this problem, make both the column names and its DBFields to be left aligned and adjust their location using the same Geometry X before exporting it to a general CSV file.
- When you specify to export a report tab to a columned CSV file,
- Objects in the exported file will be located according to their Row Index and Column Index property values. When setting values for these two properties, pay attention to the following:
- Make sure that the Row Index and Column Index property values for all objects in the report tab do not conflict with each other. Otherwise, some objects may be replaced.
- If either the Row Index value or Column Index value of an object is less than 1, JReport will ignore this object and all its children.
- In the exported file, you may find that some column names are not aligned with their DBFields. They may be displayed in different columns. To resolve this problem, set the Column Index value of the column name and its DBField to the same; if they are different, adjust it manually before exporting it to CSV format.
- If the report tab contains drawing objects, you need to manually adjust these objects' geometry properties, which are Top Attach Column, Top Attach Row, Bottom Attach Column and Bottom Attach Row.
- You are not recommended to export a mailing label report to a columned CSV file.