
Applying RLS to a parameter
When a parameter is bound with another column, you can apply a record-level security policy (RLS) in the data source, which is defined on the bound column, to the parameter, then at runtime, end users will only see data which the SID allows to view display in the parameter value drop-down list.
The following example explains how to apply RLS to the value drop-down list of a parameter in detail.
- Open the demo catalog SampleReports.cat and in the Catalog Browser, expand the data source where to create the parameter.
- Right-click Security Entry in the Security node and then click Add Security Entry.
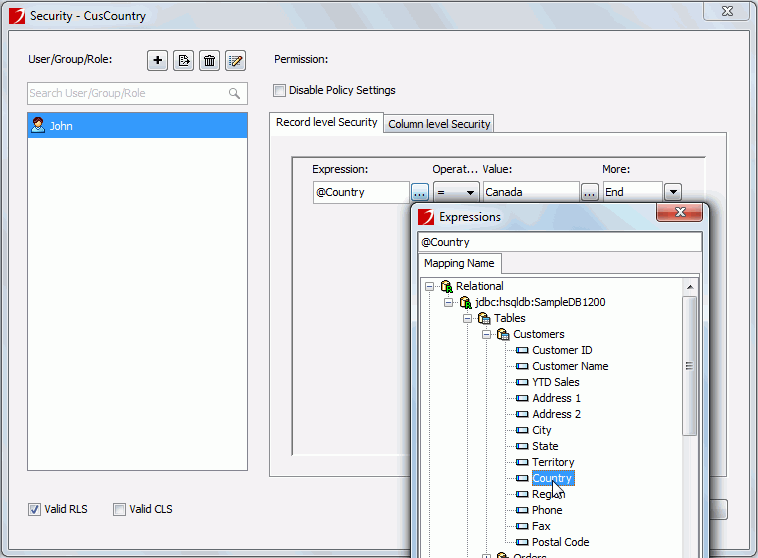
- Name the security policy CusCountry and in the Security dialog check Valid RLS.
- Click
 and then select Add User to add the user John, which has the permission to view the Canada records in the Country column only.

- Add another user David which has the permission to view records in the United Kingdom only.
For details about how to set up a RLS policy, refer to Setting up a connection-scope security policy.
- In the same data source, right-click the Parameters node and then click Add Parameter.
- In the Create Parameter dialog, enter pCountry in the Name field, select Bind with Single Column from the Value Setting drop-down list, and bind the parameter with the Country column. In the Options box, select CusCountry as value of Record Level Security, and then set the Distinct option to true.
- Create a query CustomersInfo on the table Customers. Select all the fields contained in the table.
- Create a standard banded report based on the query, and have the fields Customer ID, Customer Name, Country and Phone displayed in the report.
- In the Resource View panel, right-click the node that represents the query, and then select Edit Query from the shortcut menu.
- In the Query Editor, click Query > Filter.
- In the Search Condition dialog, add a condition for the query as follows (for details, see Filtering with the filter format):

- Click OK to apply the changes to the query.
- View the report, and in the Security Identifier dialog, enter John and click OK, the Enter Parameter Values dialog will then be displayed.
- Click the parameter value drop-down list, and you can see that only Canada is displayed for the user SID.
- View the report again and this time enter the user SID David. You will find that only the value United Kingdom is displayed in the parameter value drop-down list this time.
Notes:
- When applying an RLS policy to a parameter bound with a column, you must make sure the parameter bound column and the column used to set conditions in the RLS policy are in the same table. In addition, if the RLS policy also contains conditions defined on other columns, all the columns must be in the same table, and the RLS policy cannot contain parameters and formulas; otherwise, when you apply the RLS to the parameter, the RLS would not work properly.
- When you have applied an RLS policy to a parameter and then you click the SQL button in the Create Parameter dialog to edit the SQL statement of the parameter, the parameter value drop-down list may be Null because the changed SQL statement may not match the permissions of the RLS.
- To have the RLS applied to a parameter work on JReport Server, the users for the RLS must be imported from the server. If the users are created in JReport Designer, you need to first create these users on JReport Server, and then in JReport Designer, synchronize the security information with JReport Server by means of importing security information from the server with the Merge option checked.


 and then select Add User to add the user John, which has the permission to view the Canada records in the Country column only.

