
You can apply filters to business views and data components such as tables, crosstabs and charts of a web report so as to narrow down the data displayed in the web report.
When creating web reports, you can choose to apply some filter to the specified business view to narrow down the data scope of the data component using the business view.
In Web Report Studio, filters for business views are defined into two categories: predefined filters and user defined filters. As the name suggests, predefined filters are defined in advance when creating or editing the business views in JReport Designer, and user defined filters are created on business views while they are used.
Filters can be applied to a business view in the report wizard.
When it is in the advanced mode, you can also choose to apply a predefined filter of the specified business view from the Query Filter drop-down list. If you prefer to define a filter on your own, select User Defined from the drop-down list, and then define the filter according to your requirements. You can also edit a predefined filter if required and save it as a user defined filter to the business view.
Repeat this to add more filter expressions if required. To delete a condition line, click  on its left.
To group some conditions, select them and click the Group button, then the selected conditions will be added in one group and work as one line of filter expression. Conditions and groups together can be further grouped. To take any condition or group in a group out, select it and click Ungroup. It is the equivalent of adding parenthesis in a logic expression.
To adjust the priority of a condition line or a group, select it and click the Up or Down button.
To delete a condition line or a group, select it and click the Delete button.
Note: Query filters take effect on the component level, which means each time you create a component, you can apply a filter to the business view the component uses and it will not affect other components based on the same business view.
There are the following ways you can take in order to filter the data components in a web report: using the Filter dialog, using the Filter panel, using the Filter web control, or via shortcut menu.
When using the Filter dialog to filter report data, you can only make the filter applied to a specific data component in the current web report.
To filter report data using the Filter dialog:
 on the Standard toolbar. The Filter dialog is displayed. See the dialog.
The Filter dialog provides an entry to all the filters used in the current web report except query filters. You can click the Inspector button to view the detailed filter information.
You can also use the Filter web control to filter one or more data components that use the same data source in a web report. A filter control can do filtering based on one field. For details, see Using filter control to filter report data.
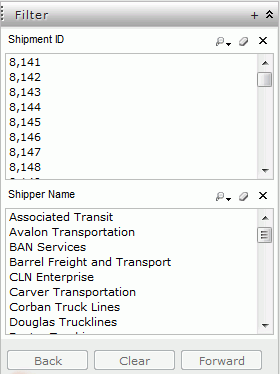
The Filter panel on the left of Web Report Studio is used to filter data components in the current report that are using the same business view. To do this:
You can make use of the Ctrl or Shift key to do multiple selection.
The value selection applies a filter condition and the logic is as follows:
Selected_Field=Selected_Value
For example, Country=USA
(Selected_Field1=Selected_Value1 or Selected_Field1=Selected_Value2) and (Selected_Field2=Selected_Value3 or Selected_Field2=Selected_Value4)...
For example, (Country=USA or Country=China) and (Year=2008 or Year=2009)
The following shows more about working with the Filter panel:

You can use the buttons on the bottom of the Filter panel to deal with the value selection in the panel.
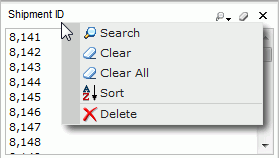
After right-clicking on a group/detail name title bar, these options are available for managing the group/detail object.

 on the group/detail name title bar to launch the appropriate quick search toolbar. For detailed usage about the quick search toolbar, refer to Select Values dialog.
 on the group/detail name title bar to achieve this.
Notes:
The Filter panel can be regarded as a collection of special filter controls which apply to all data components using the same data source. While common filter controls can choose the data components they apply, still under the circumstance of using the same data source.
When there are filter controls, including the special ones in the Filter panel, that apply to the same data components, and when these controls' fields have cascading relationship, the cascading relationship will be revealed when you select values in the controls.
For example, there is a filter control based on the field Country, a filter control on City, and another on State. The first two share one table while the third shares nothing with the other two. In this case, Country and City values will show cascading relationship, but State values will not participate. You select USA in the Country filter control, the values in the City filter control will change as follows if the control has scrollbar: the cities belong to USA are displayed in the upper area of the filter control, and the other cities are put in the lower area and grayed out. For the case that the City filter control has no scrollbar: all the values remain their positions and the values not belonging to USA are grayed out. In both cases all the values are selectable. But the State values remain as before, since the selection of them will not affect the data components that the Country and City filter controls control.
You can also use filter-related commands on the shortcut menu to filter the data in a table. To do this, point to any value of the field other than the group by field, by which you want to filter data, then right-click to show the shortcut menu. You will see the Filter item which provides a submenu containing the following commands:
For example, if you select 5 from the First N submenu for a certain field, then only the records with the field value equal to one of the first five field values will be displayed.
For example, if you select 5 from the Last N submenu for a certain field, then only the records with the field value equal to one of the last five field values will be displayed.