

Lesson 1: Creating a business cube
Business cubes are created from tables, views, formulas and summaries in a data source. In this lesson, we will create a business cube based on data in Data Source 1 of the JinfonetGourmetJava.cat catalog.
This lesson contains the following tasks:
Task 1: Add cube elements
- Click Start > All Programs > JReport 13 Update 1 > Designer to start JReport Designer. The JReport Designer window and the Welcome to JReport Designer dialog appear.
- In the Welcome to JReport Designer dialog, click the Catalog link in the Open category.
- Browse to select the JinfonetGourmetJava.cat catalog file in
<install_root>\Reports\JinfonetGourmetJava, then click the Open button. The Catalog Browser displays.
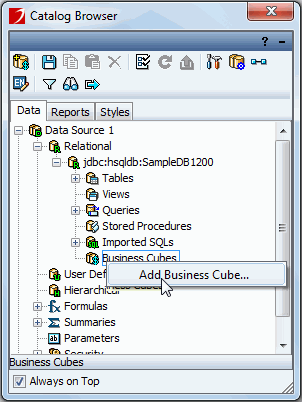
- In the Data tab of the Catalog Browser, expand the Data Source 1 > Relational > JDBC connection node, then right-click the Business Cubes node and click Add Business Cube on the shortcut menu.
- Enter BusinessCubeDemo in the Input Business Cube Name dialog and click OK. The Business Cube Editor displays.
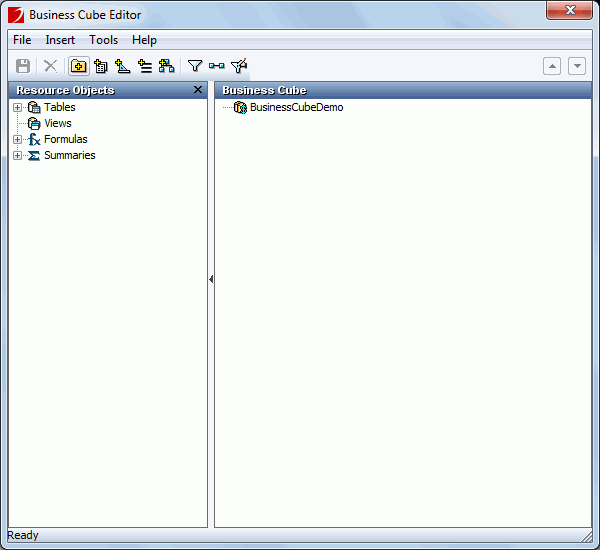
Our business cube will have three categories: one for dimension objects, one for measures objects and another for detail information objects.
- Click Insert > Category, then in the Category Property dialog, enter Dimensions in the Display Name text field and click OK.
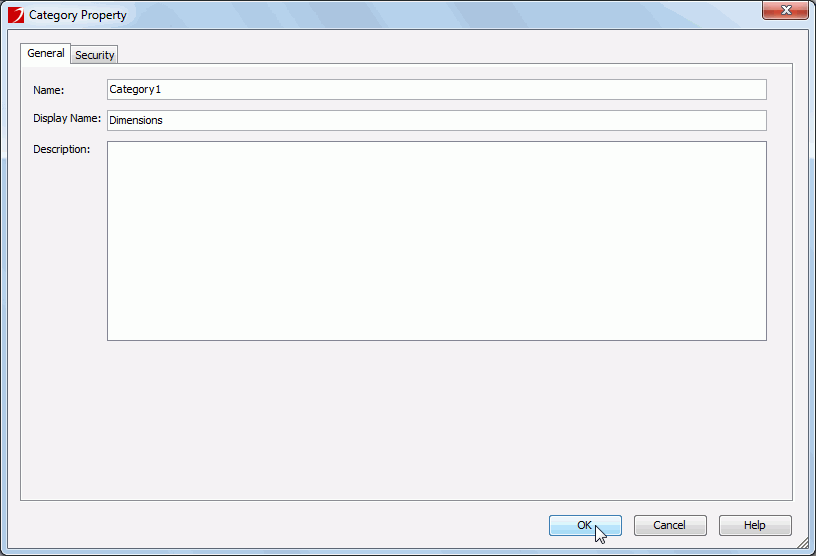
The Dimensions category is added to BusinessCubeDemo in the Business Cube panel.
- Expand the Customers table in the Resources Objects panel, drag the fields Customers_City, Customers_State, Customers_Country, Customers_Territory and Customers_Region from the table and drop them on the Dimensions category.
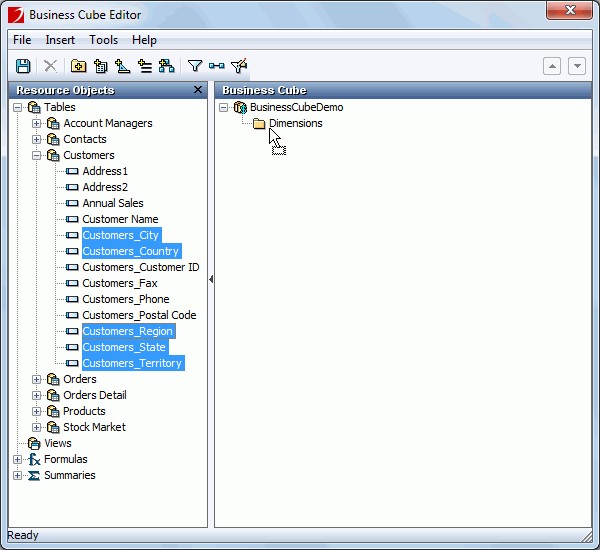
By default, these fields are converted to dimension objects. Later we can define hierarchies on them. To have more control over the type of cube elements, the Edit Cube Element dialog can be used.
- Right-click the Customers_City object and choose Edit from the shortcut menu.
- In the Edit Cube Element dialog, change the display name of the object to City, and then click OK.
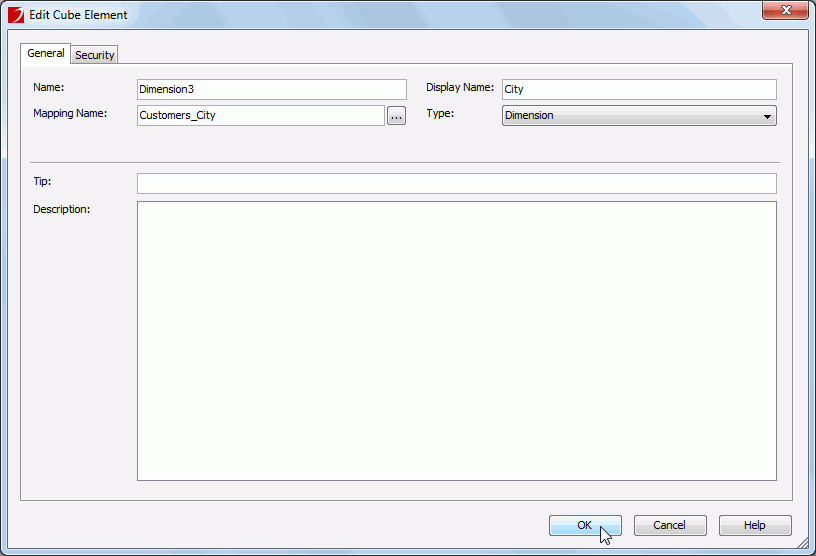
- Repeat the above two steps to edit the display name of the objects Customers_State, Customers_Country, Customers_Territory and Customers_Region to State, Country, Territory and Region.
- Drag and drop the fields Order Date from the Orders table, Product Name, Category and Product Type Name from the Products table, Employee Position from the Account Managers table onto the Dimensions category.
- Edit the display name of the objects Product Type Name, Employee Position and Order Date to Product Type, Job Position and Sales Date as explained above.
Besides dragging and dropping fields from tables onto category, the other way to add cube elements is by using the Add Cube Element dialog. Next, we will add more elements to the Dimension category via dialog.
- Right-click the Dimensions category and select Add Cube Element from the shortcut menu.
The Add Cube Element dialog appears. The default cube element type is Dimension chosen from the Type drop-down list.
- Click the chooser button
 next to the Mapping Name field, then double-click Name in the Account Managers table in the Cube Element Resources dialog.
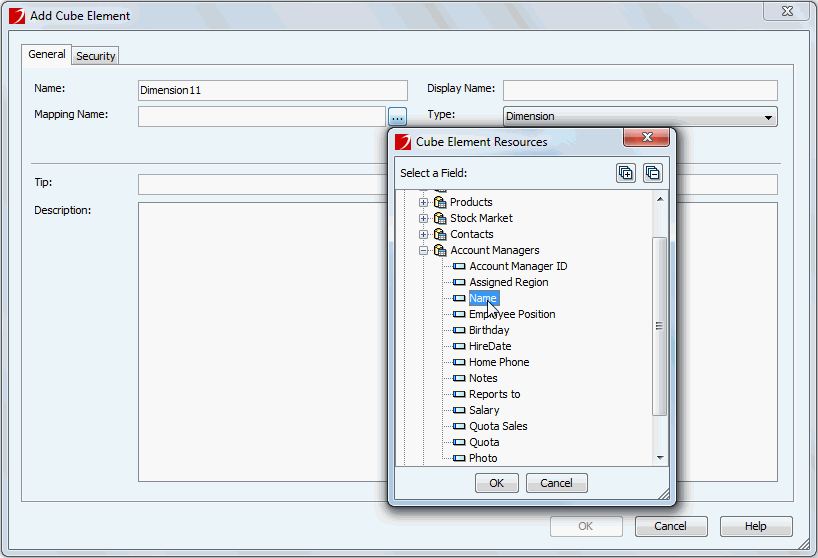
- The display name of the dimension object is then automatically set as Name. Change it to Employee Name, then click OK in the Add Cube Element dialog to add the element.
- Repeat Step 13 to 15 to add the dimension objects Sales Year, Sales Quarter, Sales Month and Sales Day from the formulas YearOfOrderDate, QuarterOfOrderDate, MonthOfOrderDate, and DayOfOrderDate.
Next, we will create another category to hold the detail information objects we need.
- Select the BusinessCubeDemo node in the Business Cube panel, click Insert > Category.
- In the Category Property dialog, enter Detail Information in the Display Name text field and click OK.
- Drag and drop Customer Name, Annual Sales, Address1, Customers_Phone and Customers_Fax from the Customers table onto the Detail Information category.
- Right-click the Address1 object, select Rename from the shortcut menu to rename it as Customer Address.
- Rename the Customers_Phone and Customers_Fax objects to Phone and Fax.
- Expand the Orders table, drag and drop the fields Order Date, Required Date, Ship Date, Ship Via, Shipped and Payment Received onto the Detail Information category.
- Drag and drop the field Products_Product ID from the Products table onto the Detail Information category, and then rename it to Product ID.
- Expand the Formulas node, drag and drop CustomerCityStateZip and Total to the Detail Information category.
- Rename the Total object to LineItemTotal.
The fields are added as dimension objects by default, so we need to change their types to detail information.
- Select all objects in this category by pressing the Ctrl or Shift key on the keyboard, then right-click them and select Edit from the shortcut menu.
- In the Edit Cube Element dialog, change their types to Detail Info and click OK.
Now that we have the detail elements exposed in our business cube, we need to add some related measures.
- Select the BusinessCubeDemo node in the Business Cube panel, click Insert > Category, then in the Category Property dialog, enter Measures in the Display Name text field and click OK.
- Right-click the Measures category and choose Add Cube Element.
- In the Add Cube Element dialog, select Measure from the Type drop-down list, select the field Quantity from the Orders Detail table as the mapping field, choose Sum from the Aggregate Function drop-down list, edit the display name as Total Quantity, then click OK to add the element.
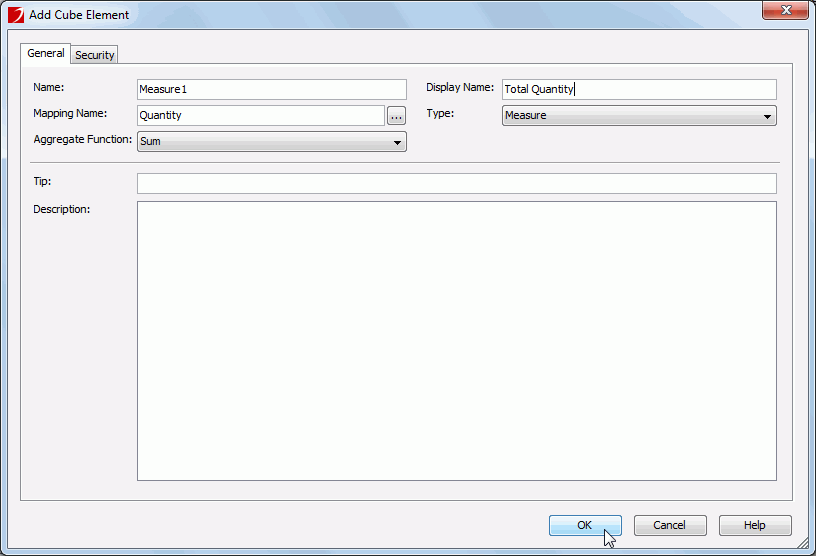
- Repeat Step 29 to 30 to add the following measure objects:
- Display name: Total Discount
Mapping field: Discount in the Orders Detail table
Aggregate function: Sum
- Display name: Total Sales
Mapping field: the Total formula
Aggregate function: Sum
- Display name: Total Shipping Cost
Mapping field: Shipping Cost in the Orders table
Aggregate function: Sum
- Display name: Average Price
Mapping field: Unit Price in the Orders Detail table
Aggregate function: Average
- Click File > Save on the menu bar of the Business Cube Editor window to save the business cube.
By now, the business cube is created and it consists of objects from tables and formulas, while the fields in the tables are independent of each other, so our next task is to set up some relationships between different tables.
Task 2: Set up joins
A business cube is based on tables (including views). By default, there is no relationship among the tables. In order to make them correlated, you need to define joins between them. In this task, we will build several joins between the tables we have added to the business cube.
- In the Business Cube Editor, choose Tools > Join Editor to open the Business Cube - Join Editor window.
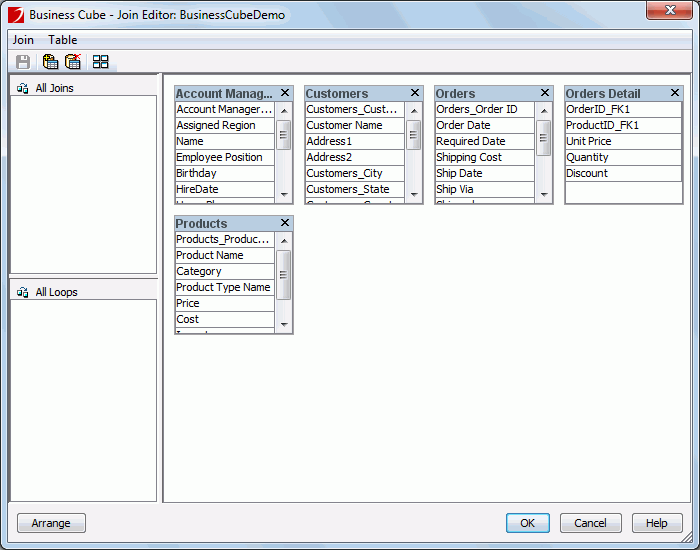
All the tables that are added to the business cube are listed in the join panel. First, we will create a join between the Account Managers and Orders tables based on manager IDs.
- Resize the two tables to make all column names in them fully displayed.
- Scroll down the Orders table to make the AccountManagerID_FK1 column shown.
- Position the mouse pointer over the column Account Manager ID in the Account Managers table, click and hold the left mouse button, move the
mouse pointer to the AccountManagerID_FK1 column in the Orders table, then release the mouse button.
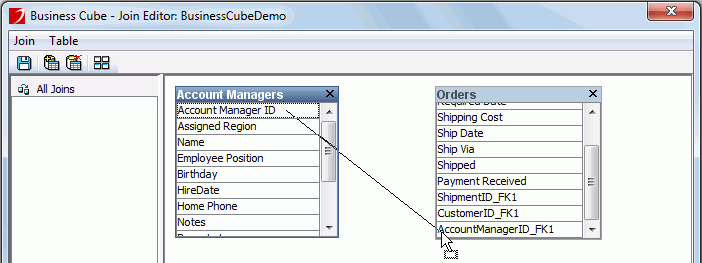
The join relationship is then established between the two tables, and a join named Join1 is automatically added to the All Joins panel in the Join Editor.
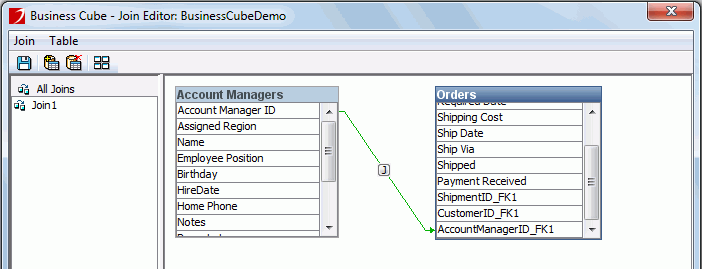
- Repeat the above steps to set up the following joins:
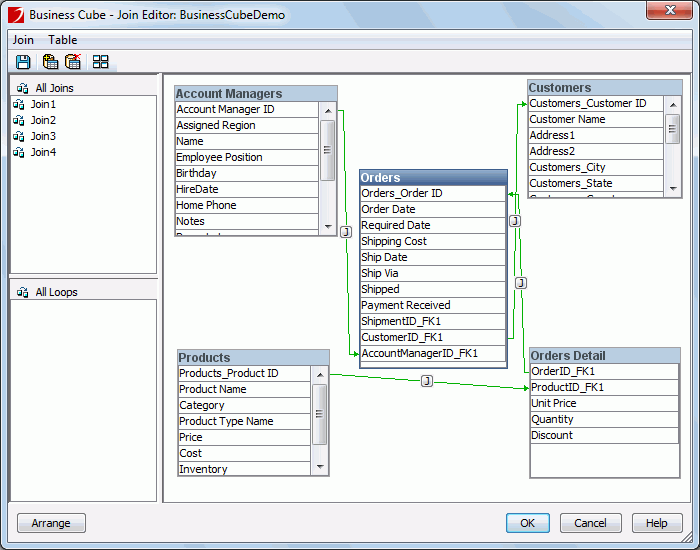
- Join2, which joins the Customers and Orders tables based on customer IDs
- Join3, which joins the Orders and Orders Detail tables based on order IDs
- Join4, which joins the Products and Orders Detail tables based on product IDs
After done, we will have four joins between tables in the business cube as follows:
- Click Join > Save to save the joins and then close the Business Cube - Join Editor window.
- Save the business cube to save the joins.
Task 3: Define hierarchies
In this task, we define some hierarchies in the business cube. Hierarchies support drilling in the ad hoc report, that is, allowing measures to be calculated based on different levels.
- In the Business Cube Editor window, select the root node of the business cube in the Business Cube panel, then click Insert > Hierarchy on the menu bar.
- In the Add Hierarchy dialog, input Geography and click OK. The Geography hierarchy node will be added at the bottom under the business cube root node.
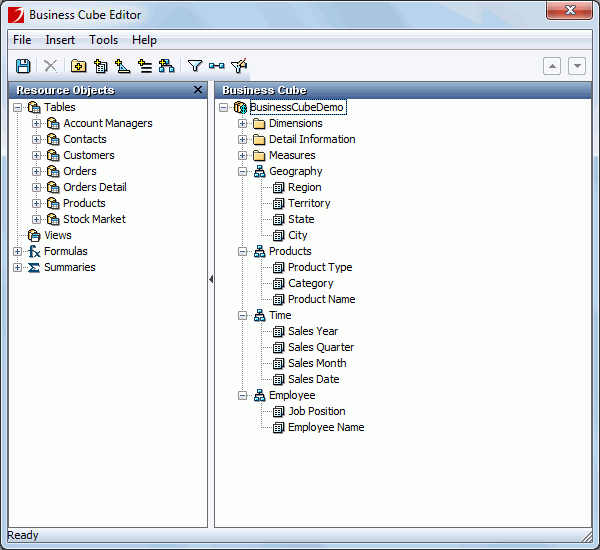
- In the Business Cube panel, drag these dimensions Region, Territory, State and City one by one following this order to the Geography hierarchy node. Region will be the highest level and City the lowest.
- Follow steps 1 to 3 to create a new hierarchy named Products and add the dimensions Product Type, Category and Product Name to the hierarchy.
- Create another hierarchy named Time and add the dimensions Sales Year, Sales Quarter, Sales Month and Sales Date to it.
- Add one more hierarchy named Employee and add the dimensions Job Position and Employee Name to the hierarchy.
Now, four hierarchies have been defined in the business cube.
- Save the business cube to save the hierarchies.
Task 4: Define built-in filters
In this task, we add a built-in filter to the business cube so as to discard some unwanted data.
- Click the Filter button
 on the toolbar of the Business Cube Editor, and the Filter dialog displays.
We only want the data of employees who are sales representatives or marketing staff.
- In the Filter dialog, click the Add Condition button to add a filter line.
- Click
 next to the field text box, then in the Cube Element Resources dialog, expand BusinessCubeDemo and then Account Managers, select Employee Position and click OK to return to the Filter dialog.
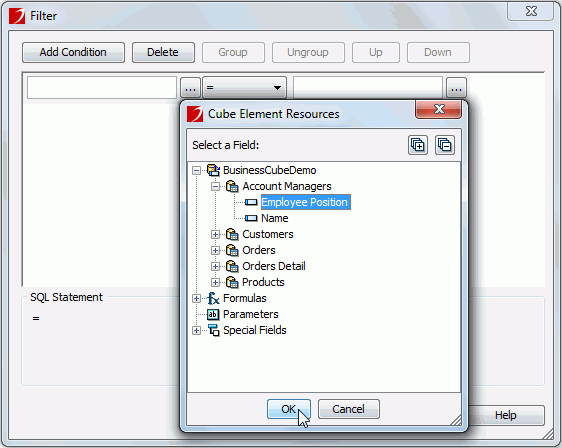
- Select = as the operator.
- Click
 next to the value text box.
- In the Values dialog, select Employee Position in the Fields tab, then switch to the Value tab and double-click Sales Representative.
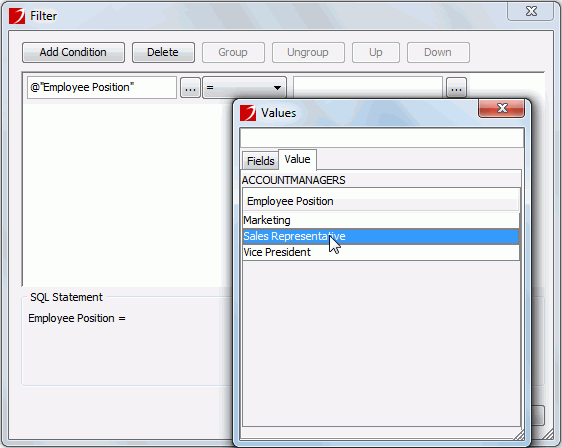
- Close the Values dialog to return to the Filter dialog again.
- Click the Add Condition button to add another filter line and specify the relationship between the two lines as Or from the logic drop-down list.
- Set the condition of the newly added filter to be Employee Position = Marketing as explained above.
- Click OK in the Filter dialog to save the built-in filter settings.
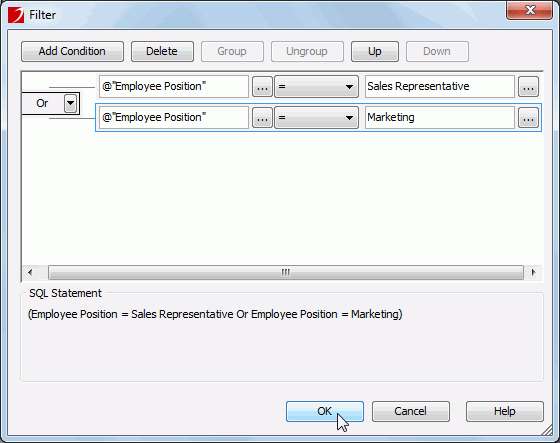
- Save the business cube to save the filters.
Task 5: Add predefined filters
Built-in filter takes effect anytime when the business cube is adopted. However, predefined filter can be applied or not at runtime.
- Click the Predefined Filter button
 on the toolbar of the Business Cube Editor, and the Predefined Filter dialog displays.
We can add one or more predefined filters to the business cube. Here we will add two filters; one focuses on the sales information on the country USA in the year 2006 and the other discards data of products which is in the Seasonal category.
- In the Predefined Filter dialog, click the New button to add a filter.
- Double-click the filter name in the Name cell to rename it to USA2006, and provide a short description to the filter: Sales of 2006 in USA.
- In the Condition panel, set the condition of the filter as Country = USA AND Sales Year = 2006.
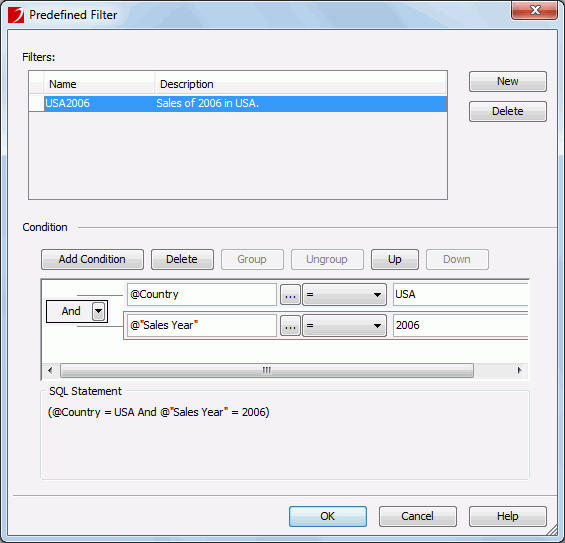
The Condition panel is similar to the Filter dialog. We can set conditions to predefined filters as we do to built-in filters.
- Click the New button again to add a new filter.
- Name the filter NotMild and give a short description to the filter: Product category is not Mild.
- Set the condition of the filter to be Category != Mild.
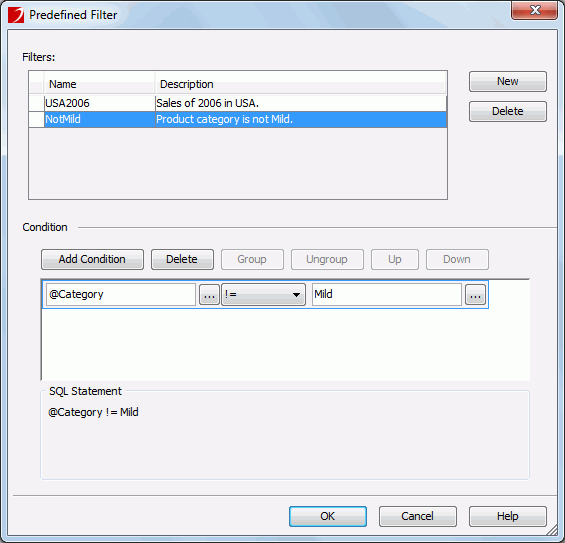
- Click OK in the Predefined Filter dialog to save the predefined filter settings.
- Save the business cube.
Lesson 1 summary
In this lesson, we created a business cube and added some cube elements in it, including categories, dimension objects, measure objects and detail information objects. Then, we set some hierarchies on the measure objects so as to enable drilling in ad hoc report. At last, we defined some filters on the business cube to narrow down the data scope.


 next to the Mapping Name field, then double-click Name in the Account Managers table in the Cube Element Resources dialog.


 on the toolbar of the Business Cube Editor, and the Filter dialog displays.
 next to the field text box, then in the Cube Element Resources dialog, expand BusinessCubeDemo and then Account Managers, select Employee Position and click OK to return to the Filter dialog.

 next to the value text box.

 on the toolbar of the Business Cube Editor, and the Predefined Filter dialog displays.
