

Lesson 1: Creating a business view
A business view is similar to a report cube. Report cube dimensions are business view groups and report cube measures are business view aggregations. Create business views when your end users are primarily interested in higher quality presentation style reports. Use report cubes when users are primarily interested in analyzing the data from many dimensions. Both business views and report cubes can be built on top of the same query to support both types of users. Business views are created and managed in JReport Designer.
A business view is built from four kinds of elements:
- Group objects are typical DBFields by which you want to group data. They present the availability and key performance of data, and characteristically return text data or dates, and answer the following question: who, when, what, where and which.
- Aggregation objects are typically numeric DBFields to which an aggregate function, such as Sum, is applied or they can be an existing aggregation from the catalog.
- Detail objects are any DBField, typically they are values that you would want to display in the Detail section of a table. But they can be any type of DBField.
- Categories are simply folders for organizing the other three elements.
In this lesson, we will create a business view based on data in Data Source 1 of the JinfonetGourmetJava.cat catalog.
This lesson contains the following tasks:
Task 1: Create the query
In this lesson we will create a business view based on a query, so creating a query is our first step. The business view will provide data information about customers, orders, orders detail, and products, therefore we will make the query contain these tables and set up relationship among the tables.
- Click Start > All Programs > JReport 13 Update 1 > Designer to start JReport Designer. The JReport Designer window and the Welcome to JReport Designer dialog appear.
- In the Welcome to JReport Designer dialog, click the Catalog link in the Open category.
- Browse to select the JinfonetGourmetJava.cat catalog file in
<install_root>\Demo\Reports\JinfonetGourmetJava, then click the Open button. The Catalog Browser displays.
- In the Data tab of the Catalog Browser, expand the Data Source 1 > Relational > JDBC connection node, then right-click the Queries node and click Add Query on the shortcut menu.
- Enter WorldWideSales in the Input Query Name dialog and click OK.
- In the Query Editor window, click Query > Add Table on the menu bar.
- In the Add Table dialog, select the tables Customers, Orders, Orders Detail and Products and click Add to add them to the query, then click Done to exit the dialog.
The four added tables are displayed with their columns and automatically joined based on the auto join criteria.
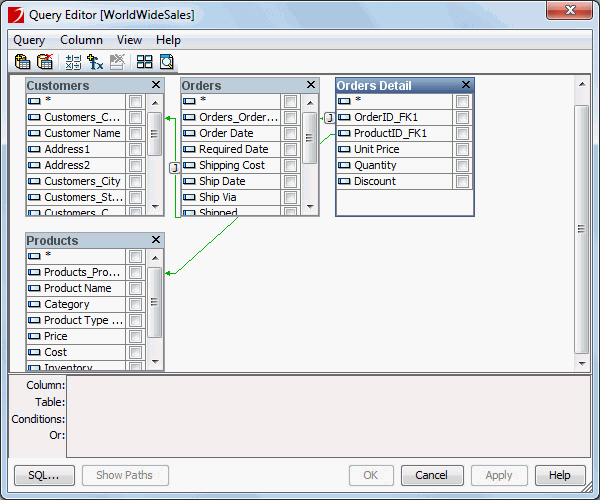
- In the Customers table, check the * checkbox to select all columns in the table, then uncheck these columns: Address2, Customers_Fax, and Annual Sales. In the Orders table, select Orders_Order ID, Order Date, and Payment Received. In the Orders Detail table, select Unit Price, Quantity, and Discount. In the Products table, select all its columns first by checking *, then unselect Inventory and Reorder Level.
- Click OK at the bottom of the Query Editor window to create the query.
Task 2: Create the business view
- Right-click the Business View node in the newly created WorldWideSales query and select Add Business View from the shortcut menu.
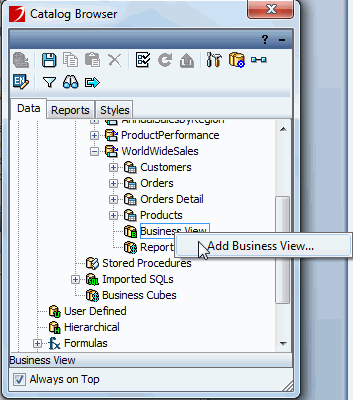
- Type in WorldWideSalesBV in the Input Business View Name dialog and click OK. The Business View Editor displays.
We will create three categories in the business view to hold customer, order and product information respectively.
- In the Business View panel of the editor, select WorldWideSalesBV and right-click, then select Add Category from the shortcut menu.
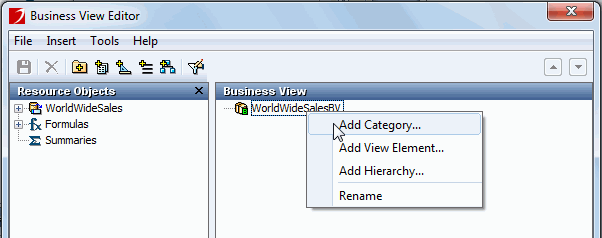
- In the Category Property dialog, input Customers as the Display Name, then click OK.
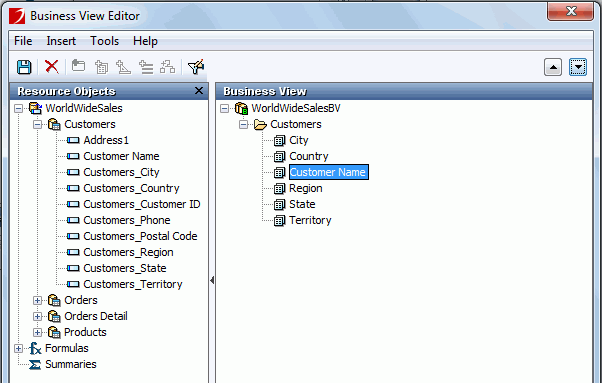
- Expand the Customers table in the Resource Objects panel, select the fields Customer Name, Customers_City, Customers_Country, Customers_Region, Customers_State, and Customers_Territory in the table, then drag them into the Customers category in the Business View panel.
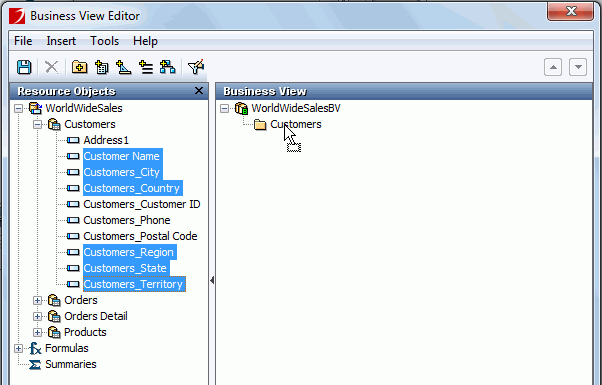
- Change their display names using the shortcut menu option Rename to City, Country, Region, State, and Territory, by removing "Customers_". Then select the Customer Name object and click
 twice to move it below Country to make the objects displayed in alphabetical order.
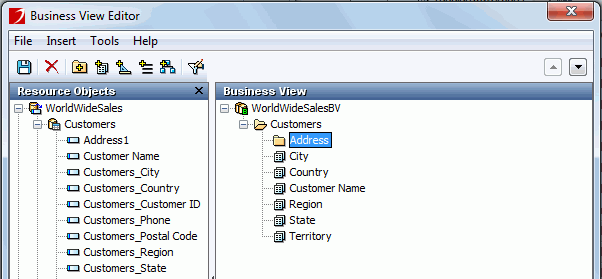
- Create a sub category Address in the Customers category to hold address information. Move it above the City group object by using the button
 .
.
- From the Customers table in the Resource Objects panel, select Address1, Customers_Country, Customer Name, and Customers_Phone and drag them into the Address category.
- Select Customers_Country, right-click it and select Edit on the shortcut menu. In the Edit View Element dialog, edit its display name to Country and type to Detail, then click OK. Edit the display name of Customers_Phone to Phone and type to Detail using the same way.
Also edit the type of Address1 and Customer Name to Detail.
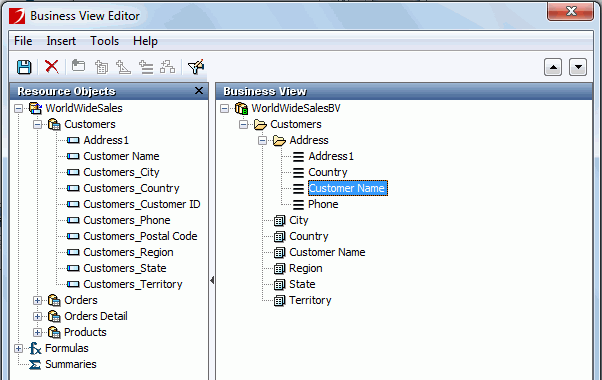
By now the Customers category is finished. Next, we are going to create the Orders Detail category.
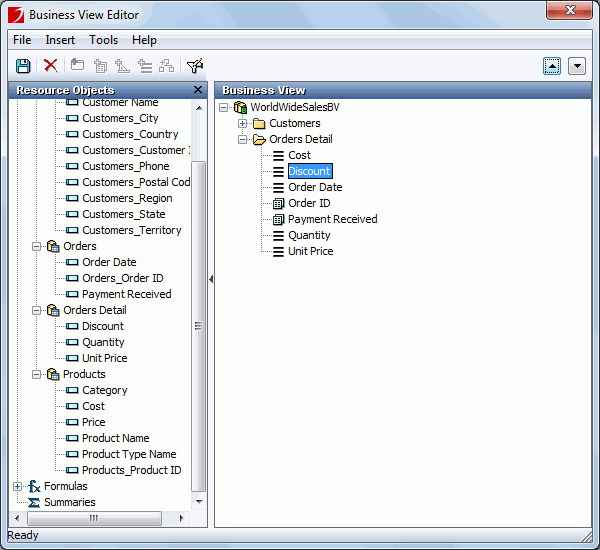
- Create a category Orders Detail in WorldWideSalesBV. Add these fields from the Resource Objects panel into the category: all the fields from the Orders and Orders Detail tables, Cost from the Products table. Modify the display name of Orders_Order ID to Order ID. Change the type of Cost, Discount, Order Date, Quantity and Unit Price to Detail. Arrange the order of the view elements: move Cost to the top, move Discount below Cost.
See the result:
View elements can also be added into a business view by using dialog instead of dragging and dropping. Next, we are going to add more objects to the Order Detail category using dialog.
- Select the Orders Detail category, right-click it and select Add View Element from the shortcut menu.
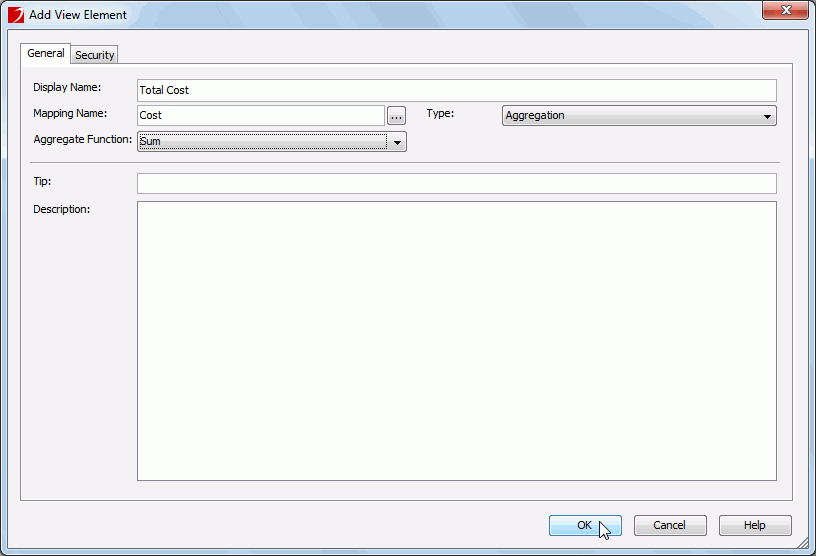
- In the Add View Element dialog, type Total Cost in the Display Name text field, click
 next to the Mapping Name text field to select Cost from the Products table, set Type to Aggregation, select Sum from the Aggregate Function drop-down list, then click OK.
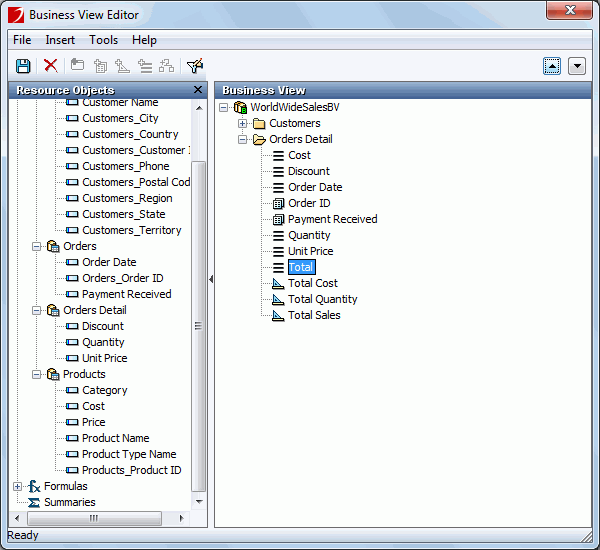
- Create another two aggregation objects Total Quantity which sums on Quantity and Total Sales which sums on the formula Total, and a detail object Total which is mapped to the formula Total using the same way.
- Arrange the objects in the Orders Detail category in alphabetical order:
Next, we will create the Products category to hold product related information.
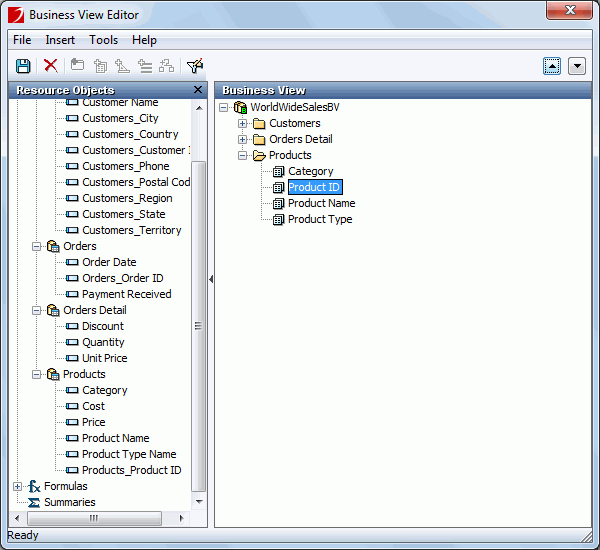
- Create a category Products in WorldWideSalesBV, add Category, Product Name, Product Type Name, and Products_Product ID from the Products table in the Resource Objects panel to it, modify the display names of Product Type Name to Product Type and Products_Product ID to Product ID, then arrange the objects in alphabetical order.
- Click File > Save on the menu bar of the Business View Editor window to save the business view.
Task 3: Define hierarchies in the business view
In this task, we define some hierarchies in the business view. Hierarchies enable drilling up and down through report data.
- In the Business View Editor, select the root node of the business view in the Business View panel, then click Insert > Hierarchy on the menu bar.
- In the Add Hierarchy dialog, input Geography and click OK. The Geography hierarchy node will be added at the bottom under the business view root node.
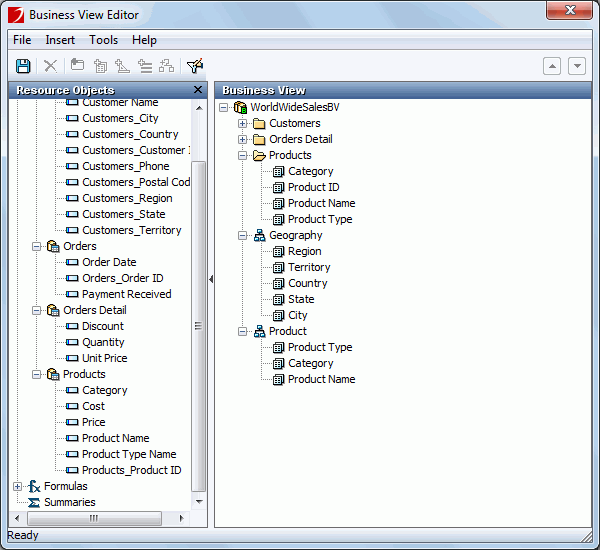
- In the Business View panel, drag these objects Region, Territory, Country, State and City one by one following this order to the Geography hierarchy node. Region will be the highest level and City the lowest.
- Follow steps 1 to 3 to create another hierarchy named Product, then add Product Type, Category and Product Name to the hierarchy.
Now, two hierarchies have been defined in the business view.
- Save the business view to save the hierarchies.
Lesson 1 summary
In this lesson, we created a query and then a business view based on the query. Besides this, there is simpler and faster way to create a business view: if there is already a report cube that contains the data for your business view, right-click the report cube, then select Create Business View from the shortcut menu. A business view following the structure of the report cube will be created.


 twice to move it below Country to make the objects displayed in alphabetical order.

 .
.


 next to the Mapping Name text field to select Cost from the Products table, set Type to Aggregation, select Sum from the Aggregate Function drop-down list, then click OK.


