

Lesson 2: Creating a web report using JReport Designer
In this lesson we will create a web report as the role of a report developer, based on the business view WorldWideSalesBV created in the previous lesson. The report will show each product's sales information, including order ID, order date, quantity, unit price, discount, and the total sales for each order. We will use a table to display the information, plus a chart to demonstrate the total sales of each product. In order for end users to see sales information within a specific range, such as region, country, category, product name, or product type, we will add filter controls for dynamically filtering the data according to their requirements.
This lesson contains the following tasks:
Task 1: Create the initial report
- On the JReport Designer menu bar, click File > New > Web Report. A blank report is created.
Be sure that JinfonetGourmetJava.cat is the current catalog because it is the catalog where WorldWideSalesBV is created. For information about specifying this catalog, see Task 1, Step 2 of Lesson 1 in Track 2.
- Right-click the report body, select Split from the shortcut menu.
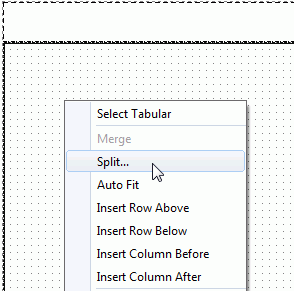
- In the Split Cell dialog, set both numbers to 2, then click OK.
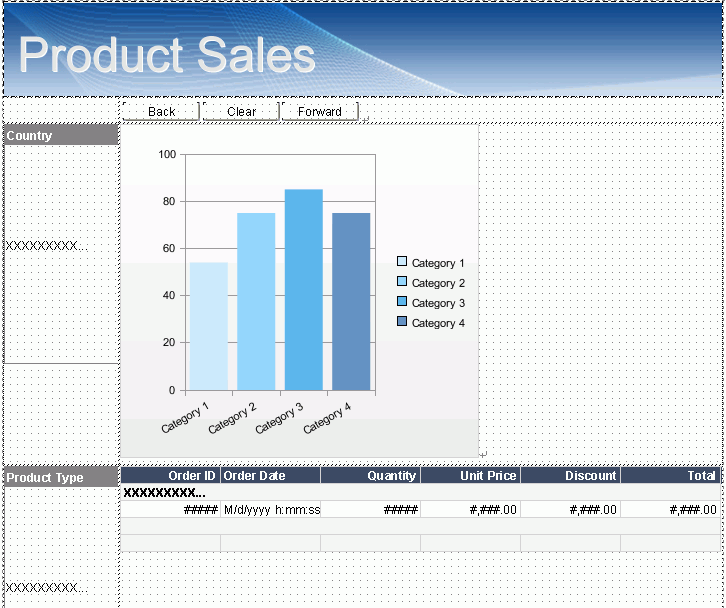
The report body will be hosted by four tabular cells. We will put the filter controls in the left cells, a chart and a table in the right cells. First we create a chart to demonstrate the total sales of each product.
- Drag Chart from the Toolbox panel to the right cell in the first tabular row. The Create Chart wizard appears.
- In the Data screen, select WorldWideSalesBV in Data Source 1. Click Next.
- In the Type screen, check the Single chart radio button, select Bar as the chart type and Clustered Bar 2-D as the sub type, then click Next.
- In the Display Screen, add Product Name to the Category box and Total Sales to the Show Values box.
- Switch to the Style Screen, select ClassicBlue as the chart style, then click Finish to create the chart.
Next, we will create a table to display the sales information just below the chart.
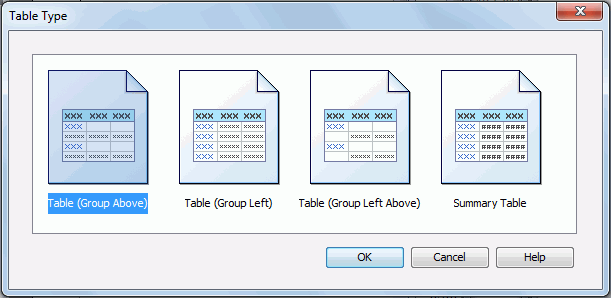
- Drag Table from the Toolbox panel to the right cell in the second tabular row. The Table Type dialog appears.
-
Keep the default selection in the Table Type dialog and click OK. The Create Table wizard is displayed.
- In the Data screen of the wizard, select WorldWideSalesBV in Data Source 1, then click Next.
- In the Display Screen, add the following fields to be displayed in the table: Order ID, Order Date, Quantity, Unit Price, Discount, and Total. Click Next.
- In the Group screen, add Product Name as the group by field.
- Switch to the Style Screen, then select Neutral (Default) as the table style.
- Click Finish to create the table.
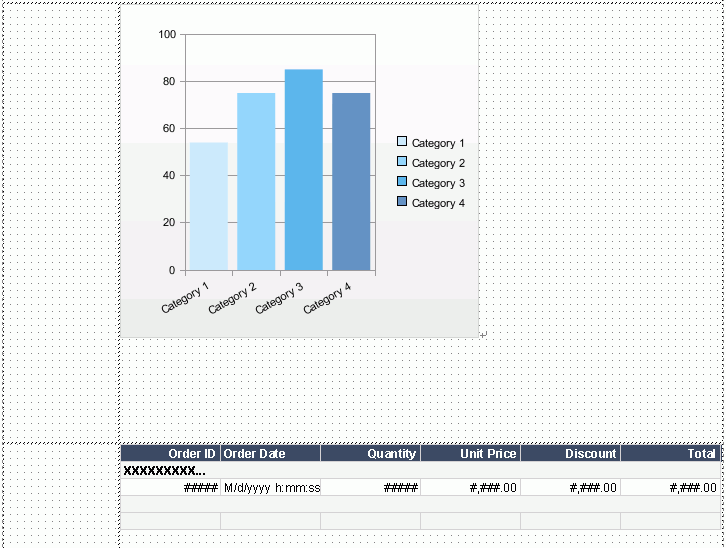
- Resize the cell the table is in to make all columns in the table shown. The report displays as follows:
We will add two filter controls for end users to dynamically filter data according to their requirements.
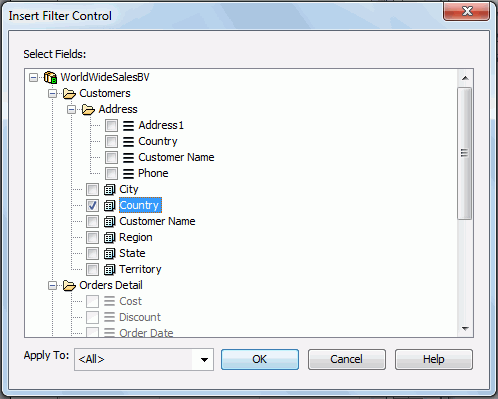
- Drag Filter Control from the Toolbox panel to the first tabular cell, then in the Insert Filter Control dialog, select Country and click OK.
The filter control will be inserted. End users will be able to select one or more countries in it, the selected values will be applied to the previously created table and chart to show data based on the values.
- Insert another filter control in the below tabular cell, based on the field Product Type using the same way.
We will add a navigation control which helps end users deal with the filter applying status in all the filter controls in the report: go back to the previous filter applying status, go forward to the next, or clear all the filter applying histories. We will create the navigation control above the chart in the report.
- Select the cell the chart is in, right-click and select Insert Row Above from the shortcut menu.
- Select the right cell in the newly added tabular row, then in the Report Inspector, set its Height property to 0.28.
- Drag Navigation Control from the Toolbox panel to the right cell in the newly added tabular row, that is the cell above the chart.
Lastly, we will insert an image to show the title of the report in the report page header.
- Select the tabular cell in the report page header, in the Report Inspector, set its Height property to 1.
- Drag Image from the Toolbox panel to the page header, in the Select an Image dialog, select ProductSalesHeader.gif, then click Open.
Then select PageHeaderPanel in the Report Inspector to move the focus out of the image so as to cancel the scrollbars around the image.
The report now appears as follows in design view:
Task 2: Format the web report
To improve the report appearance, we need to do some adjustments to the components in the report. First, we will format the chart.
- Select the chart, or the ChartObject node in the Report Inspector, then resize it to make it fully occupy the cell that holds it.
- Keep the chart selected, in the Properties panel of the Report Inspector, set the Show Legend property in the Platform category to false.
- Right-click on the chart, select Format Axes > Format Category(X) Axis from the shortcut menu.
- In the Format Category(X) Axis dialog, switch to the Orientation tab, check the Angle radio button, set the value to -35 deg, then click OK. By doing this, we can make the tick mark labels on the category axis
displayed completely.
- Right-click on the chart again and click Format Axes > Format Value(Y) Axis on the shortcut menu.
- In the Format Value(Y) Axis dialog, go to the Format tab, select Number from the Category box, select $#,##0 from the Format box, then click Add to add the format in the Stack box. Click OK to exit the dialog.
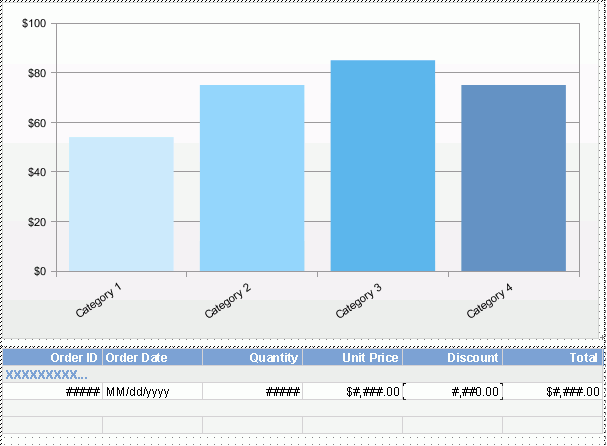
Next, we will format the table:
- Select the table header (TH) row, then in the Properties panel, set its Background property to 0x7da1d1.
- Select the group header (GH) row and set its Background property to 0xeeeeee.
- Select the group by field in the group header, resize it horizontally to make sure the product names won't get truncated, then in the Report Inspector, set its Foreground property to 0x7da1d1.
- Select the Order Date DBField in the detail row, set its Format property in the Text Format category to MM/dd/yyyy.
- Select the Unit Price and Total DBFields in the detail row and set their Format property to $#,###.00. Modify Discount's Format property to #,##0.00.
The chart and table now look as follows:
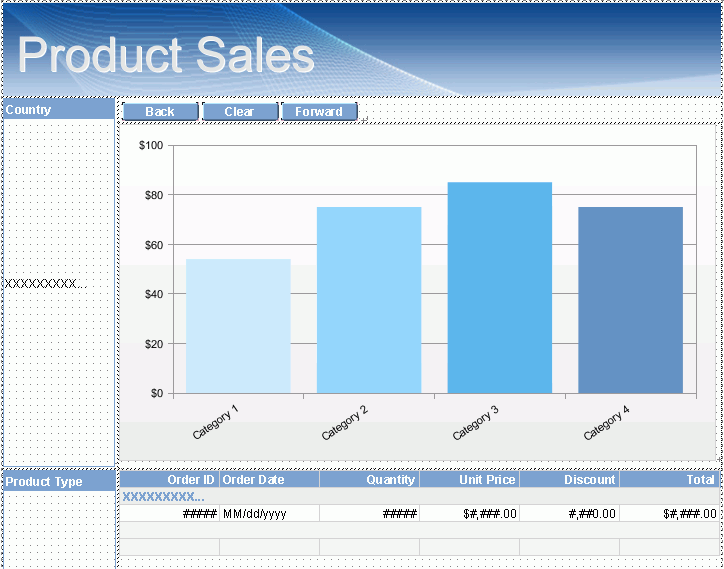
Next, we will format the two filter controls and the navigation control:
- Select the Country filter control, resize it to make it the same size as the tabular cell that holds it. Resize the other filter control too.
- Select the nodes that represent the two filter controls in the Report Inspector, then in the Properties panel, set their Border Color property in the Border category to 0x7ca2cf, and Background in the Title category to 0x7ca2cf.
- Select the three buttons in the navigation control, in the Report Inspector, set their Bold property to true, Background to 0x7ca2cf, and Foreground to White.
The cell above the Country filter control is empty, to improve the report layout, we will make the cell merged with the cell that holds the Country filter control.
- Select the empty cell and the cell the Country filter control is in by pressing the Ctrl button, right-click and select Merge from the shortcut menu. If you find it difficult to select the cell that holds the Country filter control, you can first select the filter control, then go to the Report Inspector, select the parent node of the filter control which represents the tabular cell.
- Resize the Country filter control once again to make it fully occupies the merged cell.
After doing the adjustments, the report appears somewhat like follows:
- Click File > Save to save the report as Products.wls.
Task 3: Preview the web report
In this task we will preview the web report and perform some operations on it in JReport Designer. End users can also do the same thing on the web report after it is published to JReport Server.
- Click View > Preview As > Web Report Result on the menu bar. The report is opened in Web Report Studio.
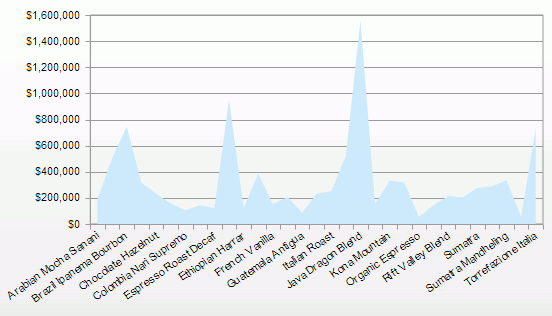
First, we will change the chart type to area.
- Click Edit Mode on the toolbar to switch Web Report Studio to the edit mode.
- Select the chart platform, you will find the button
 available on the toolbar. Click the button, go to select Area > Area 2-D from the drop-down menu.
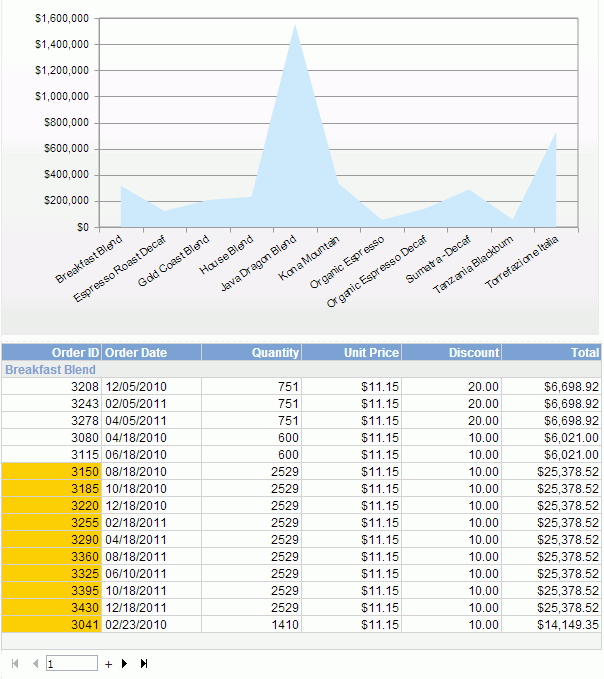
The chart now looks as follows:
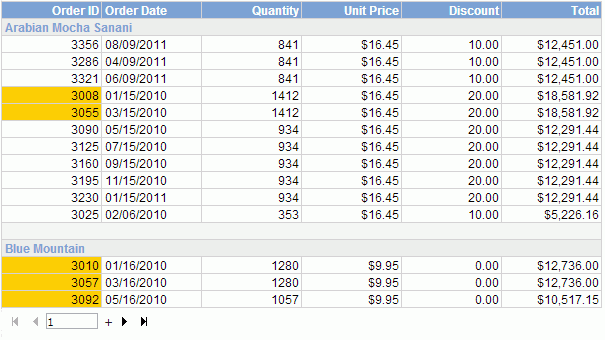
The table contains a lot of data. However, we would like to view data about total orders larger than $5000. So next, we will apply a filter to the table to narrow down data displayed on it.
- Click the Filter button
 on the toolbar.
- In the Filter dialog, select TableComp from the Apply to drop-down list, compose the condition as Total >= '5000', then click OK.
The table is now displays as follows:

Next, we will apply a conditional formatting to the table to highlight the order IDs with the order quantity more than 1000.
- Right-click in the Order ID column, and select Conditional Formatting from the shortcut menu.
- In the Conditional Formatting dialog, click
 to open the Edit Conditions dialog, set the filter condition to Quantity >= '1000', then click OK to return to the Conditional Formatting dialog. In the Format box, set Background Color to #ffcc00, then click OK.
The order IDs meeting the condition will be highlighted:
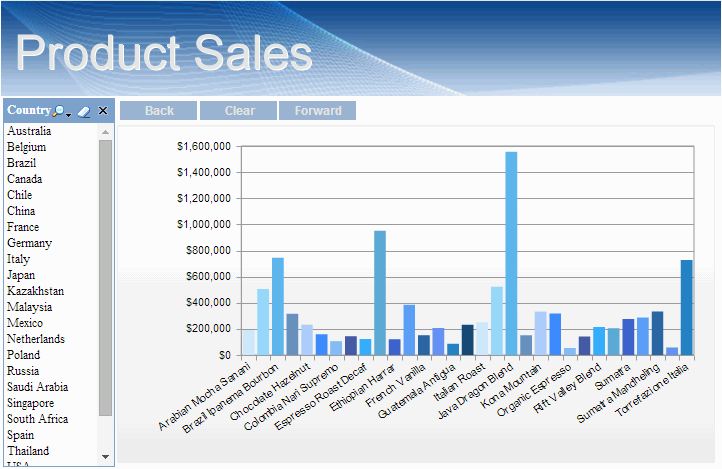
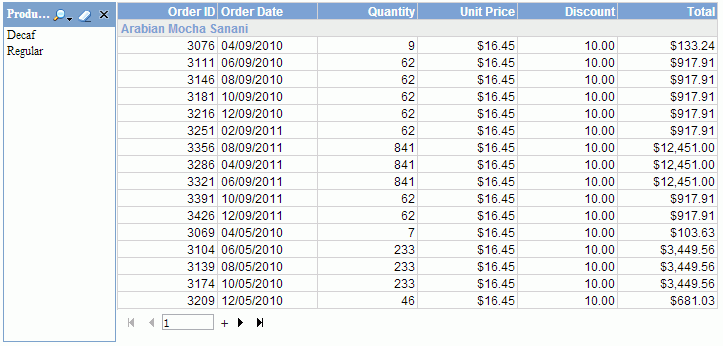
Now, we want to use the filter controls to dynamically change data displayed in the report. Since the chart and table are based on the same business view, the filters created via the filter controls will be applied to them both at the same time. First, we want to view the sales in Canada.
- Click Canada in the Country filter control, then the chart and table is refreshed to display the data for Canada only.
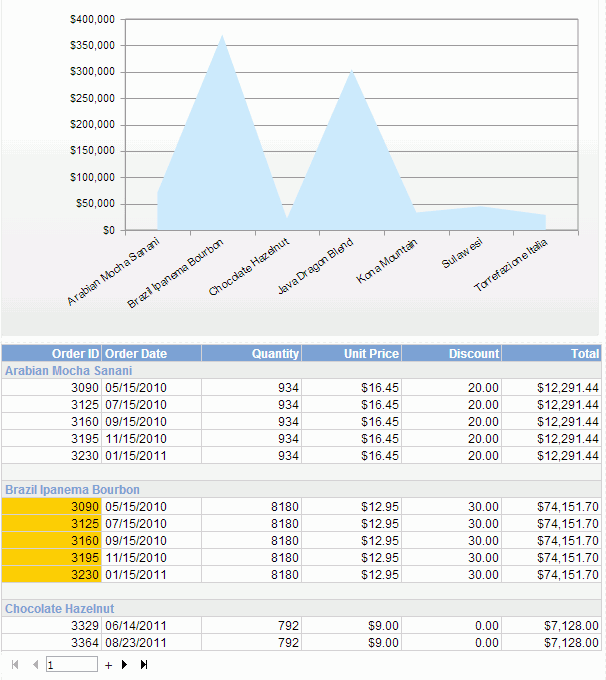
- To further view the product type Regular's sales in Canada, select Regular in the Product Type filter control. The report will be refreshed to show the corresponding data:
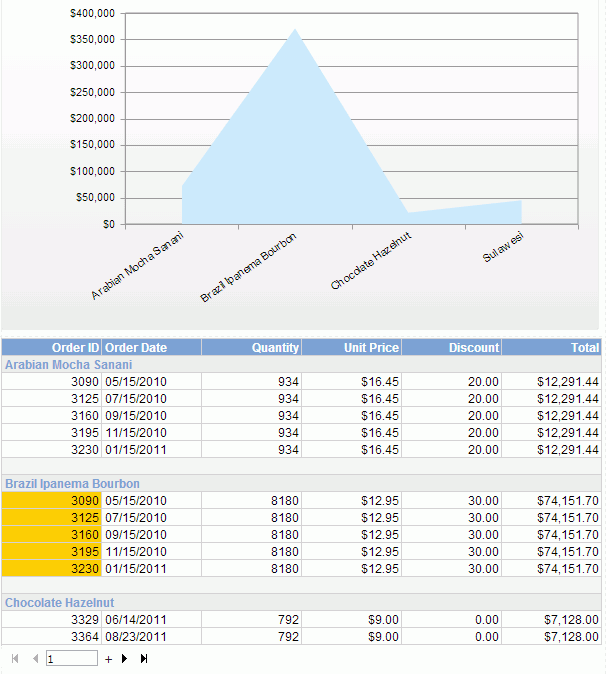
- Now we would like to see Decaf's sales in all of the countries. Since the current report data is for Canada, we need to remove the Canada filter. There are two methods to do this: in the navigation control above the chart, click Back twice to undo what we have just done in steps 8 and 9, or click Clear to simply remove the filter conditions added via the filter controls in steps 8 and 9. After back to the full data, click Decaf in the Product Type filter control, and you will see the desired data.
- Exit Web Report Studio.
Lesson 2 summary
In this lesson, we created a web report from the view of a report developer in JReport Designer and previewed it. Filter controls and navigation control are applied so that end users can view data within various specific ranges.