

This lesson describes how to run reports from JReport Console. This lesson represents one way that end users could access and run published reports. Reports that are embedded in a Java application would not be accessed from JReport Console, but instead from the Java application. The interaction with the report itself however would be the same as described here.
The reports you view in this lesson are in the JinfonetGourmetJava folder, which is the folder you published them to in Lesson 2 > Task 1 of this track.
To run a page report in Page Report Studio is to use dynamic HTML to allow end users to interact with the report and change what is displayed. JReport provides a set of built-in commands that take advantage of this functionality to provide a powerful way to interactive report such as refreshing the data (running the underlying queries), changing the sort order of the data on the report, or filtering the data so that only a subset of records are displayed.
The Page Report Studio interface benefits a lot. Each end user can customize his own report to his favorite. The report does not have to be redesigned or even re-run.
The report template and future runs of the report template are not affected.
A separate web browser window opens, with the report result for the ShipmentDetails report tab in the page report:
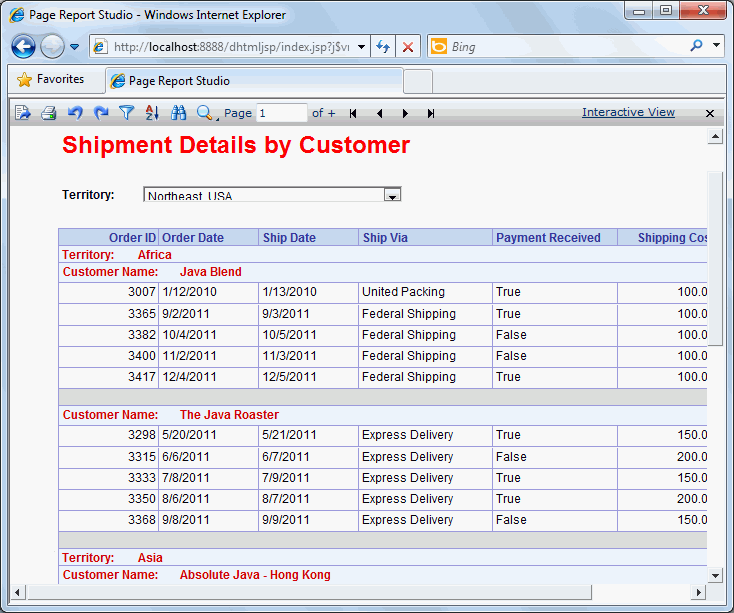
Before we interact with the report to change how the data displays, review some of the basic and useful toolbar commands:
 The navigational commands: first page, previous page, next page and last page.
 The current page and total number of pages.
 Commands for analyzing reports.
 .
.
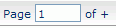
This allows you to sort the results using any of the field values. The field values are automatically provided based on the DBField names but you can also reset these names to any that you want to use when creating the report in JReport Designer. For details, see Customizing the field display names in the JReport Designer User's Guide.
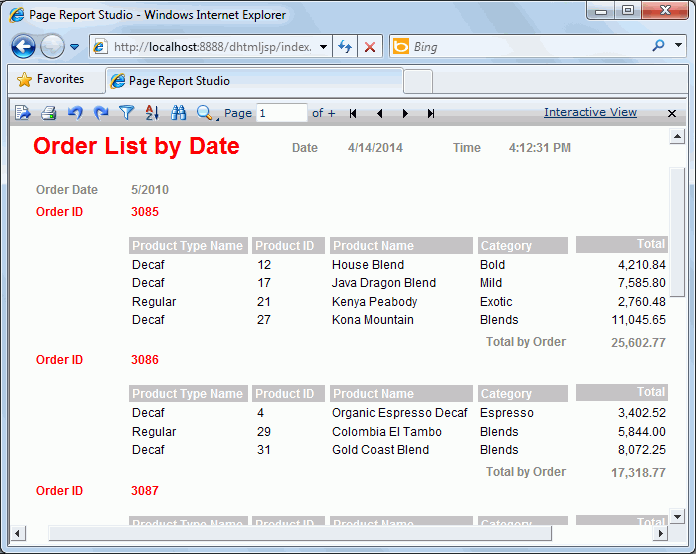
The report appears with records in each group sorted by the SHIPPING COST values. By default, the sort order is set to Ascend.
 .
.
The report now displays records shipped via United Packing only in each group, sorted by the SHIPPING COST value.
It is easy and convenient for an end user who needs this specific information to view this report. The report format is quickly restructured, but the report template is not changed. It will not affect other people to run this report.
On the Page Report Studio menu, there is an important command that we will not step through in this lesson: the Refresh command. Refresh accesses the DBMS and re-selects all of the data. Refresh is useful when data is changing dynamically and you want to see the latest information from the DBMS.
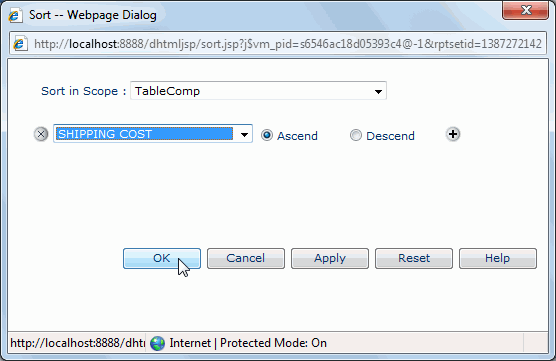
As you saw in Lesson 8 of Track 2, parameter-driven reports are another way to have a dynamic report. They allow the end users to specify the data that they want to see before the query is issued to the database. By only selecting the data that the report needs, the query is more efficient.
When a parameter-based report is run, JReport Server automatically generates an HTML page to prompt the user for the expected values. Default values, if included in the report template definition, are also displayed.
To run the parameter-based report:
A new web browser window opens for you to enter the parameter values. The report template includes start date of May 1, 2010 and end date of June 1, 2010 as default. You can click Submit button to admit these defaults, or you can type new values to view the report.
The Advanced Run command allows you to specify additional properties when running a report, for example you can specify a different report format instead of the default one. Options available include Applet, HTML, PDF, Text, Excel, Postscript, Rich Text Format (RTF), XML and Page Report. In this lesson we will run the report as PDF format.
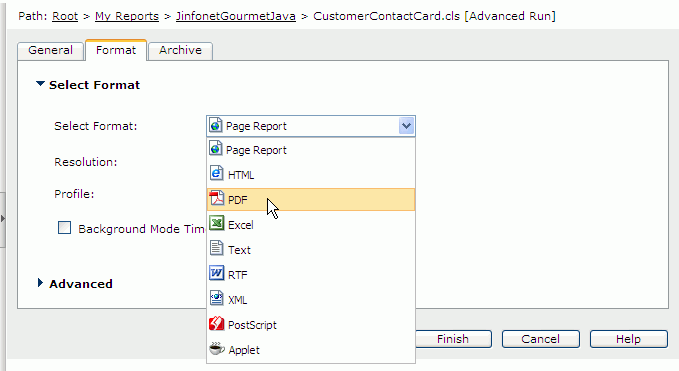
For this lesson, the additional options in the Advanced Run page are not used. However these options can be quite useful in real reporting scenarios. For example, you can specify database credentials under which the query should execute, or apply a style group so that the report has a different look and feel.
The report is displayed as a PDF file in your web browser. You can now browse the report, print it, e-mail it to a co-worker, or save it to your local disk using the Adobe Reader commands.
The PDF file is assigned a unique name and saved in C:\JReport\Server.
In this task, we return to the Page Report Studio toolbar and explore two more of its powerful commands: TOC Browser and Search.
The report tab EmloyeeDetails in the page report displays in a new web browser window.
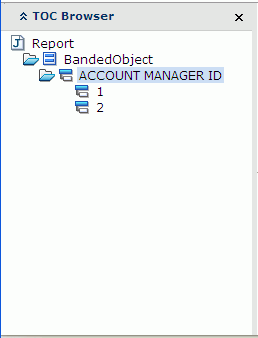
From the TOC Browser panel you can simply click on an entry to scroll the report display to that section.
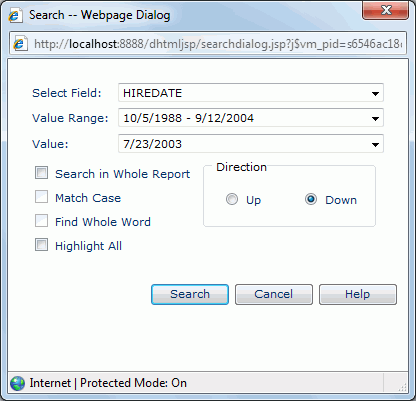
JReport Server also supports full text search of reports.
 .
.
The report display moves to the correct location.
This lesson described the ways in which published reports can be run, including how the Page Report Studio toolbar allows an end user to sort and filter data in the report. This lesson also showed a parameter-based report which allows an end user to choose the data displayed in the report. Lastly, this lesson showed how to export a report to PDF, search a report, and use the TOC Browser to navigate a report.