

Lesson 4: Scheduling reports
In Lesson 3 of this track we ran published reports by using the Run command in the JReport Console page. Reports run in this way are on-demand reports. By contrast, JReport Server allows reports to be scheduled, that is, automatically run at one or more designated dates and times.
Scheduled reports can greatly improve the performance of the reporting service in an organization. For example, reports can be run during low network traffic times. Scheduled reports can capture a time period exactly, for example the last day of the quarter.
A scheduled report is not delivered to an end user in the same way an on-demand report is. There are six destinations for scheduled reports:
- Publish to Versioning System
- Publish to File System
- Publish to E-mail
- Publish to Printer
- Publish to Fax
- Publish to FTP
In this lesson, we explore three of these:
Example 1: Publish a report to the versioning system
The built-in JReport Server Versioning System is a virtual file system maintained by JReport Server.
In this lesson we will set up a schedule to run a report immediately and specify that the generated result be kept for 30 days. Even though we run the task immediately, the result is scheduled to run through the JReport Server scheduling system.
Another advantage of scheduling a report is that it can be saved in the versioning system while normally on-demand reports will not be saved unless explicitly saved by the user.
- On the JReport Console page, go to the My Reports > JinfonetGourmetJava folder.
- Select the row with the OrderListbyDate_Parameter.cls report, right-click in the row and then select Schedule from the shortcut menu.
The General tab of the Schedule page appears. The report tab OrderDetails is selected by default to be scheduled.
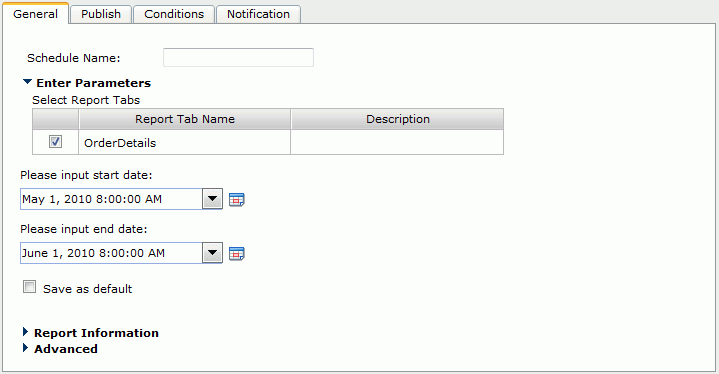
- Enter ToVersion in the Schedule Name text field.
- If desired, you can enter new parameter values or keep the default values.
- Expand the Report Information section. From both the Report Version and Catalog Version drop-down lists, choose the most recent report and catalog versions.
- Expand the Advanced section, and select Use the DB user and password defined in catalog option if it is not selected.
- Click Next to go to the Publish tab.
- In the Publish tab, click To Version and then check Publish to Versioning System.
The publishing options appear.
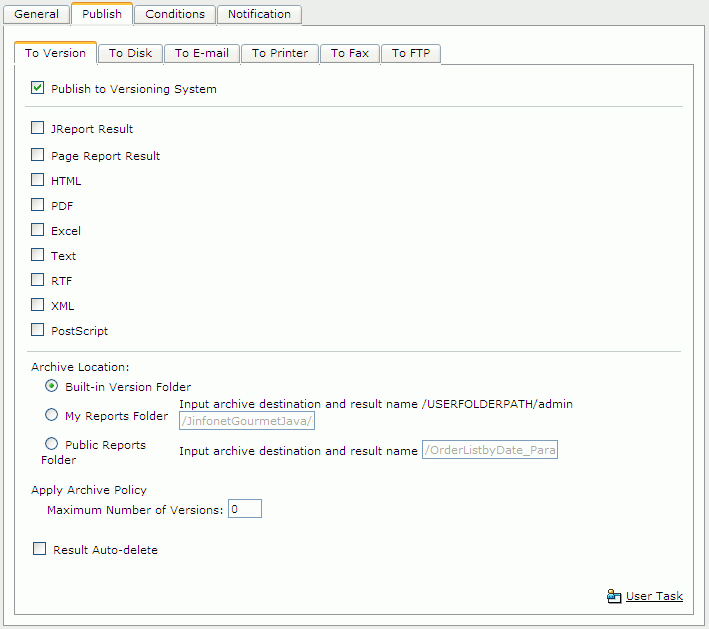
- Select the Page Report Result format, check the Result Auto-delete checkbox and set Result Expires in 30 Days.
- Switch to the Conditions tab to continue.
- In the Time sub tab, choose Run this task immediately from the Time Type drop-down list. The Time Zone field should represent your current time zone.
- Click Finish to submit the task.
You can monitor the status of the report by viewing the My Tasks page (to access this page, click My Tasks on the system toolbar). Reports that are running are listed in the Running tab; when complete they will be moved to the Completed tab. Reports which are scheduled but have not yet run are listed in the Scheduled tab.
Once you see that the report you scheduled is listed in the Completed tab, you can view the report results as follows:
- Select the row that the report is in, right-click in the row and select Version from the shortcut menu.

- In the Report Result Versions tab, click the Page Report Result link in the Result column. The full page report result file is displayed.
Example 2: Publish a report to the file system
In this lesson we set up a schedule to output a weekly sales report to the file system. The report is run every Sunday night so it will be available first thing on Monday morning.
- On the JReport Console > Resources page, go to the My Reports > JinfonetGourmetJava folder.
- Select the row with the CustomerContactCard.cls report, right-click in the row and select Schedule from the shortcut menu.
- In the General tab, enter ToPDF as the schedule name and select the report tab CustomerInformation in the report.
- Click the Publish > To Disk tab, and then check Publish to Disk.
- Check PDF. The PDF options appear.
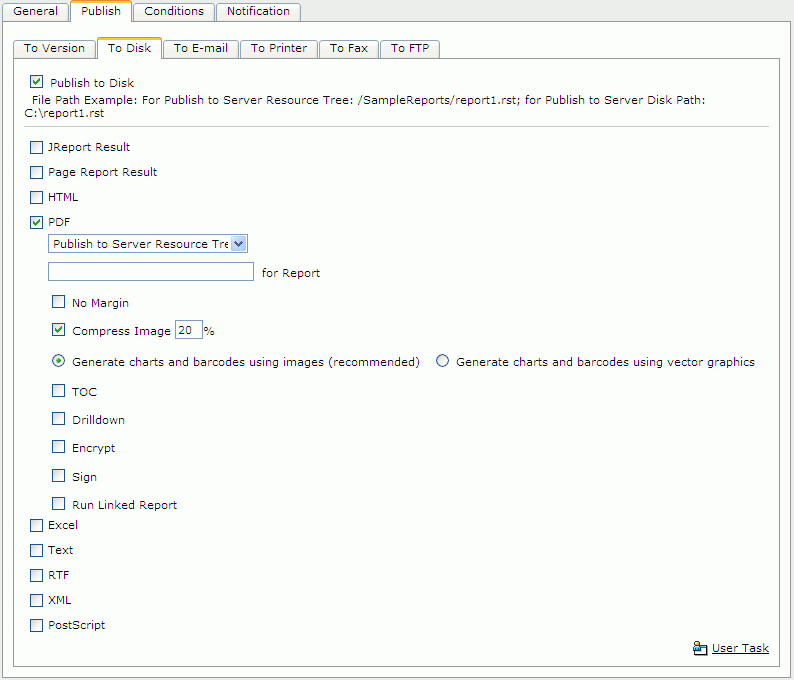
- From the drop-down list, choose Publish to Server Resource Tree and directly below the list enter /CustomerContactCard.pdf.
This publishes the report in the server resource tree under the name /CustomerContactCard.pdf.
The Server Disk Path is set by default to <install_root>\jreports thus if we want to place the output file in the <install_root>\jreports folder the path must start with a /. Alternatively we could enter a full path on the server if we wanted the file to be created outside of the server resource tree.
- Select the Conditions tab to specify the time when the task is to be performed.
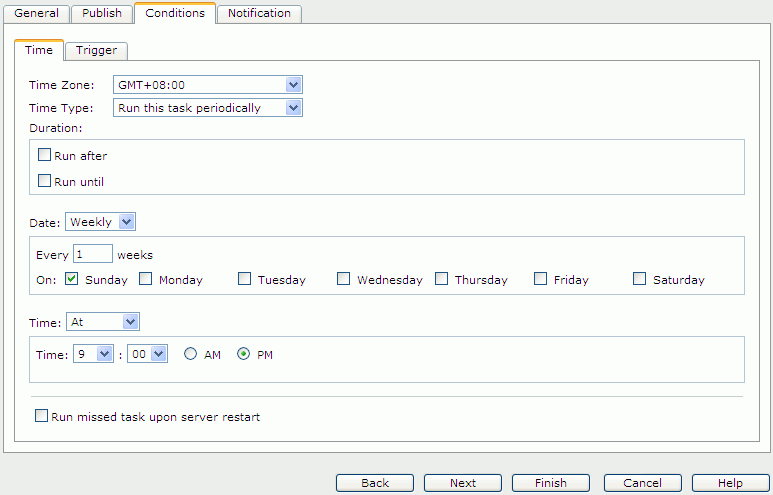
- In the Time sub-tab, choose Run this task periodically from the Time Type drop-down list. Select Weekly from the Date drop-down list and define to repeat every one week on Sunday. Select At from the Time drop-down list and specify the time as 9:00 PM.
Although we won't use it in this lesson, the Notification tab allows you to specify e-mail notifications to be sent automatically when the report is finished or if it was unable to complete successfully.
- Click Finish to submit the scheduled report request.
Since it isn't practical to wait until Sunday night to see the report in our lesson, we're going to cheat a bit and request an early version of the report.
- Click My Tasks on the system toolbar. The report we requested above should appear as a scheduled task.

- Select the task and click Run on the task bar of the My Tasks page to immediately schedule the report.
You can find the report using Windows Explorer in <install_root>\help\samples\CustomerContactCard.pdf.
Example 3: Publish a report to the printer
In this lesson we set up a schedule to output a form letter report to the printer on a monthly basis. The form letter is to be sent to delinquent customers.
- On the JReport Console > Resources page, go to the My Reports > JinfonetGourmetJava folder.
- Select the row with the ProductSalesAnalysis.cls report, right-click in the row and select Schedule from the shortcut menu.
- In the General tab, enter ToPrinter as the schedule name and select the report tab ProductSales in the report.
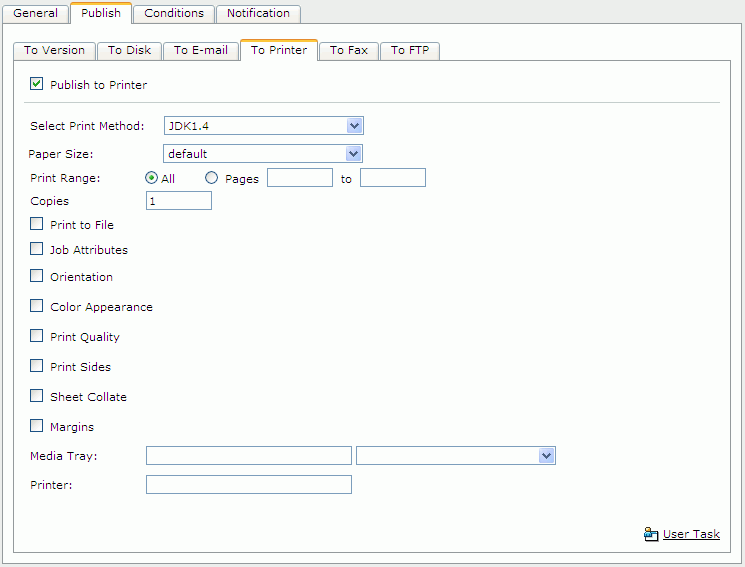
- Click the Publish > To Printer tab, then check Publish to Printer.
- Fill out the tab according to your requirements and the printer settings.
- Click the Conditions tab, and then click the Time sub tab to specify the time when the task is to be performed.
- From the Time Type drop-down list, choose Run this task periodically, select Monthly from the Date drop-down list and select to run The 1st Day of every 1 month(s) and 7:00AM as the time.
- Click Finish to enter the scheduled report request.
- Click My Tasks on the system toolbar. When the task is running, you can see the record of this task in the Running table and it will be put into the Completed table when the task is finished by the server. You probably want to go to the Scheduled tab and delete this entry so it does not print to your printer every month!
- Exit the JReport Console page by clicking the Logout link.


