

Example 1: Importing the XML file indirectly
In this example, employee.xml in <install_root>\help\samples\OOJDBC will be used. Store it to <install_root>\Demo\Reports\TutorialReports first. Then follow the steps below to import the file to a catalog.
Importing the XML file using the Model Wizard
To import the XML file employee.xml using the Model Wizard, take the following steps:
- Run ModelWizard.bat in
<install_root>\bin..
- In the Object Source Wizard, click File > Add Table.
- In the Add Table dialog, specify the class and table name as required. Here, we fill in the Table Name as employee and ClassName as com.jinfonet.jdbc.RecordResult (a class of Jinfonet). Then click the Parse button.
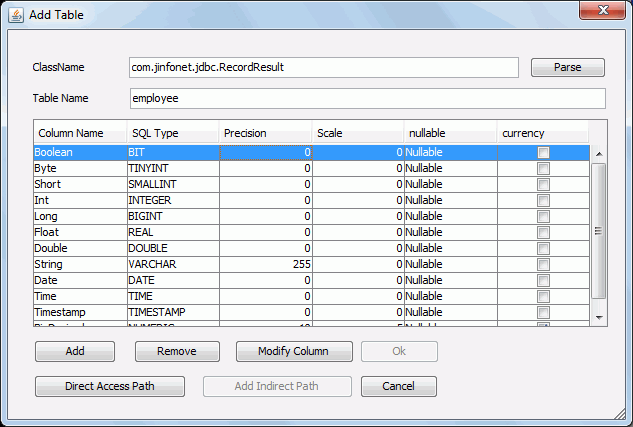
Where,
| Options |
Description |
| Column Name |
Methods of the class you have defined. |
| SQL Type |
Returned type of your column name. You can double-click the field and choose the SQL type you want. |
| Precision |
Precision of the current column. You can click on the field and change it manually. |
| Scale |
Scale of the current column. You can also click on the field and change it manually. |
| Nullable |
Current status of the column (null or not). You can double-click on the field and choose the current status: Nullable, No Nulls or Nullable Unknown etc. |
| Currency |
If your DBField contains $, you should check it. |
| Add |
Adds new columns. |
| Remove |
Removes the selected column. |
| Modify Column |
Modifies parameters of the current table. |
| OK |
Adds the table. |
| Direct Access Path |
Specifies the path for the table. OOJDBC driver can save and restore the table you have defined through
this path. |
| Add Indirect Path |
|
| Cancel |
Cancels the operation and closes the Add Table dialog. |
- Click the Remove button to get rid of all the existing columns in the Add Table dialog, and then click the Add button to add a new column.
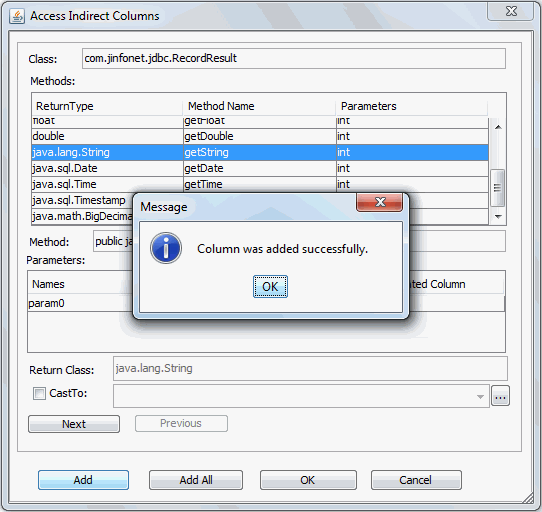
- In the Access Indirect Columns dialog, specify the data type of the column.
In this example, we will add a column of String type, so click java.lang.String in the ReturnType column of the Methods box, then click the Add button. Click OK to return to the Add Table dialog.
- In the Add Table dialog, click Direct Access Path to define the accessing path of the table in the Access Method dialog.
- Fill in com.jinfonet.jdbc.xml.XMLReader in the Root Class Name text field, click the Parse button and check Show Static Methods Only.
- Click the shown method. In the Parameters box, fill in the default values for param0 and param1 as required. For example, for param0, fill in
file:///C:/JReport/Designer/Demo/Reports/TutorialReports/employee.xml, then for param1, fill in record employee root employee column first_name 12 path document.employee.first_name.
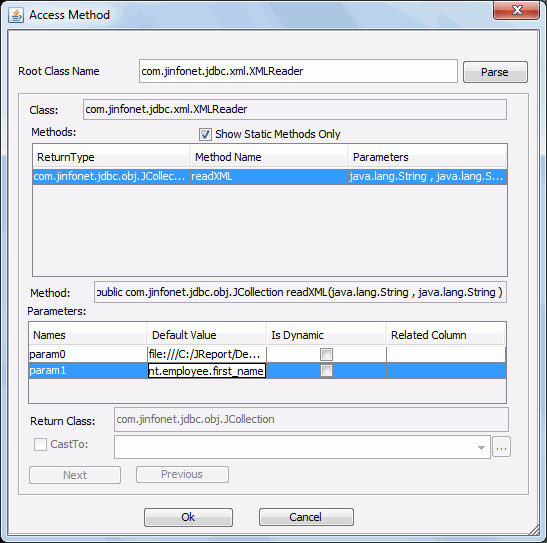
The following are explanations about the parameters.
- param0 is the valid XML file name with its path.
- param1 is the query sentence for selecting the column to be used for reporting from the XML file. record is the keyword, followed with the XML file name (without the extension .xml). Following this is another keyword column with the actual tag name from the XML file.
Below is the part quoted from employee.xml:
<employee>
<id>0799</id>
<first_name>Jack</first_name>
<second_name>Smith</second_name>
<birthday>12/28/75</birthday>
<title>manager</title>
<salary>$7000.00</salary>
</employee>
|
Since first_name is required, you should then give the actual tag name here. The number afterwards is the SQL type of the column. "12" is for String type. For detailed information about Java SQL types, refer to JDK package java.sql.types.java.
Notes:
- In param1, the order of the columns is dependent on the default values given when adding the column.
- The SQL type BINARY, VARBINARY and LONGVARBINARY are not supported.
- Click OK to return to the Add Table dialog.
- Now you can see that the column has been added in the Add Table dialog. You can rename the default column name by editing in the Column Name column. You are recommended to give the name as the actual tag definition in the .xml file, for example first_name.
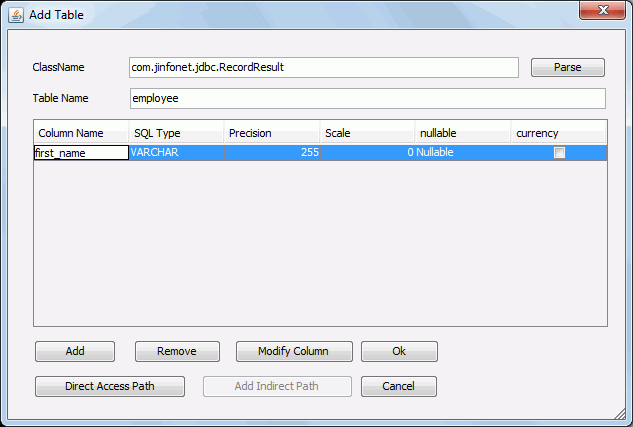
- Click the OK button, and the table employee will now have been added to the Object Source Wizard.
- In the Object Source Wizard, click File > Save. You will then be prompted to save the ODF file. You should save it to
<install_root>\lib or the directory where the catalog will be. Here we save it as employee.odf.
Notes:
- If you use dynamic parameters, that is you check the Is Dynamic option, the syntax of the method is an array of Boolean values which indicates which parameter is dynamic at runtime. If the parameter is dynamic the value should be prompted and initialized before executing an SQL. In addition, when you choose the option Is Dynamic, this parameter will be passed to JReport Designer. After you create a connection in the Catalog Browser, you will find it in the Parameters node.
- The same ODF file cannot exist in both
<install_root>\lib and the directory where the catalog is located.
- If you have purchased the readable key, you can also save the ODF file (oojdbc data definition file) to XML format (with extension .odf.xml). For files which have already been saved with an .xml extension, in order to make them available, you can manually change the extension from .xml to .odf.xml.
Importing the ODF file into a catalog
To import the generated employee.odf into a JReport catalog, take the following steps:
- Start JReport Designer.
- Click File > Catalog Management > New Catalog.
- In the Input New Catalog Name dialog, specify the catalog name, the data source name and the path. The catalog should be located in the directory where you saved the ODF file. For example, if you saved the ODF file in
C:\odf, the new catalog should be created also in C:\odf.
- In the Catalog Browser, create a new connection with the Get JDBC Connection Information dialog as follows:
- Uncheck Use ODBC Data Source.
- Check the Driver checkbox, then enter com.jinfonet.jdbc.obj.ObjectDriver in the text field that follows.
- Type jdbc:jinfonet:object:@Filename in the URL text field. @Filename should be the ODF file name. In the example, it is jdbc:jinfonet:object:@employee.
- Click OK to set up the connection.
- In the Add Table dialog, select the table employee and click Add.
- Click Done to close the Add Table dialog.
Now, the table employee will have been added into the catalog. You can use it to develop reports as required.
Note: When you publish the catalog and its reports to JReport Server, whether the ODF file is located in <install_root>\lib or in the directory where the catalog is located, it will be deployed to the path where the catalog is located in the server side.