

Example 2: Importing the XML file directly
The process of importing an XML file with Model Wizard (as explained in Example 1) can be simplified with JReport's built-in XML file import functionality, and is very easy to use.
In this example, orgchart_data.xml in <install_root>\help\samples\OOJDBC will be used. Store it to <install_root>\Demo\Reports\TutorialReports first. Then follow the steps below to import the file to a catalog.
Importing the XML file directly using the Model Wizard
To import the XML file directly using the Model Wizard, take the following steps:
- Run ModelWizard.bat in
<install_root>\bin. The Object Source Wizard will then appear.
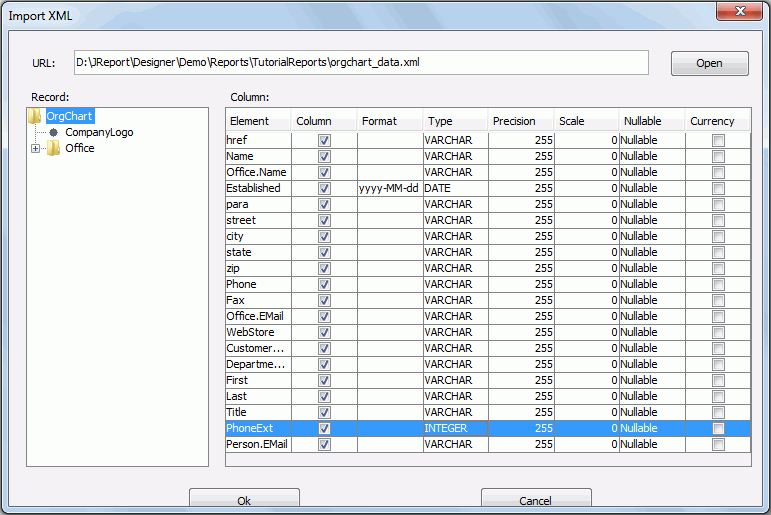
- Select File > Import XML Files to bring up the Import XML dialog.
- Click Open to browse to the file orgchart_data.xml.
- Check Column for all elements and change their format and type if necessary (for the details about how to set the format, see Examples of format).
- Click OK and the table OrgChart will now have been added to the Object Source Wizard.
- In the Object Source Wizard, click File > Save. You will then be prompted to save the ODF file. You should save it to
<install_root>\lib or to the directory where the catalog will be located. Here, we save it as orgchart.odf.
Note: The same ODF file cannot exist in both <install_root>\lib and the directory where the catalog will be located.
Examples of format
When using certain SQL types, you should input a standard format in the Format cell in the Import XML dialog. There are some examples:
- If the time format is like Tue Aug 27 16:04:00 BST 2002, you should select:
Type: TimeStamp
Format: EEE MMM dd hh:mxm:ss zzz yyyy
- If the time format is like 2002-11-22 11:09:08, you should select:
Type: TimeStamp
Format: yyyy-MM-dd hh:mm:ss
- If the time format is like 11/18/2002 08:20:00, you should select
Type: TimeStamp
Format: M/d/yyyy hh:mm:ss
- If the time format is like 1999-12-05, you should select:
Type: date
Format: yyyy-MM-dd
- If the time format is like 08:20:00, you should select:
Type: time
Format: hh:mm:ss
- If the number is like 50,600, you should select:
Type: integer
Format: ###,###
- If the currency is like $50,600, you should select:
Type: integer
Format: $###,###
Importing the ODF file into a catalog
To import the generated orgchart.odf file into a JReport catalog, take the following steps:
- Start JReport Designer.
- Click File > Catalog Management > New Catalog.
- In the Input New Catalog Name dialog, specify the catalog name, the data source name and the path. The catalog should be located in the directory where you saved the ODF file. For example, if you saved the ODF file in
C:\odf, the new catalog should be created also in C:\odf.
- In the Catalog Browser, create a new JDBC connection in the Get JDBC Connection Information dialog as follows:
- Uncheck Use ODBC Data Source.
- Check the Driver checkbox, then enter com.jinfonet.jdbc.obj.ObjectDriver in the text field that follows.
- Type jdbc:jinfonet:object:@Filename in the URL text field. @Filename should be the ODF file name. In the example, it is jdbc:jinfonet:object:@orgchart.
- Click OK to set up the connection.
- In the Add Table dialog, select the table OrgChart and click Add.
- Click Done to close the Add Table dialog.
Now, the table OrgChart will be added into the catalog. You can use it to develop reports as required.
Note: When you publish the catalog and its reports to JReport Server, whether the ODF file is located in <install_root>\lib or in the directory where the catalog is located, it will be deployed to the path where the catalog is located on the server side.