Member-level security enables report designers to limit user access to the specific members of dimensions in business/report cubes or of groups in business views.
The relationship between a user/role/group and the members of a dimension/group are classified into these groups:
A user/role/group can have its own allowed/denied set and inherit the allowed/denied sets from its parent roles or groups. The parent allowed/denied sets will be calculated first and it is a recursive process.
The following are the detailed working logic:
Here is the priority order:
Denied Set > Allowed Set > Inherited Denied Set > Inherited Allowed Set > Unspecified (no matter whether it is allowed or denied).
See the diagram below:

The final result of the members of a dimension/group that a user/role/group is allowed to access will be:
({Allowed Set} - {Denied Set}) U
(({Inherited Allowed Set from parent 1} U {Inherited Allowed Set from parent 2} U ...) - ({Inherited Denied Set from parent 1} U {Inherited Denied Set from parent 2} U ...)) U
{Unspecified if allowed}
The final set of the unspecified will be:
{All} - ({Allowed Set} U {Denied Set} U {Inherited Allowed Set from parent 1} U {Inherited Denied Set from parent 1} U {Inherited Allowed Set from parent 2} U ...)
For a user, the member-level security in a BC/RC/BV would be like this:
{Accessible members of dimension/group1} And {Accessible members of dimension/group1} And...
Note: If all members are denied in one dimension/group regardless of whether it is set in a user/role/group directly or in the parents indirectly, no data will be retrieved in this BV/BC/RC to the user/role/group.
When a catalog with the member-level security is published to the server, only the users/roles/groups on the server which match the principals defined in the member-level security will maintain the member-level security setting. Otherwise, the unmatched will lose the member-level security.
When a user/role/group is deleted from the server security system, the related member-level security setting in all catalogs will be removed.
Example 1
Here we use a simple sample to describe a case when a user belongs to multiple roles and groups.
Assume there is a dimension Order ID={1,2,3,4,5,6,7,8,9}, and we set member-level security on this dimension for a user (user1) and two roles (role1, role2) separately.
| Belong to | Allowed Set | Denied Set | |
|---|---|---|---|
| user1 | role1, role2 | 1 | |
| role1 | 2,3 | 4,5 | |
| role2 | 3,4,5 | 1,2 |
The unspecified members will be {1,2,3,4,5,6,7,8,9} - ({1}U{2,3}U{4,5}U{3,4,5}U{1,2}) = {6,7,8,9}.
Assume we set the property "Whether unspecified members are allowed" to true, which means the unspecified members {6,7,8,9} are allowed to the user.
The final result which user1 can see when only this member-level security is taking effect will be:
{1} U ( ({2,3}U{3,4,5}) - ({4,5}U{1,2}) ) U {6,7,8,9}={1,3,6,7,8,9}
Example 2
This example will be more complex to contain the concepts of four properties of member-level security.
Assume there is a summary table with three groups and summary.
| Region | Country | City | Summary (the count of Order_ID) |
|---|---|---|---|
| APAC | 41 | ||
| Australia | 20 | ||
| Sydney | 20 | ||
| China | 21 | ||
| Beijing | 9 | ||
| Hongkong | 4 | ||
| Shanghai | 8 |
And in below table, we will list the member-level security setting in the left cells of the table, and the final result which a user will get will be listed in the right cells.
| A user security setting like below | He/She will get such result | ||||||||||||||||||||||||||||||||
|---|---|---|---|---|---|---|---|---|---|---|---|---|---|---|---|---|---|---|---|---|---|---|---|---|---|---|---|---|---|---|---|---|---|
|
|
||||||||||||||||||||||||||||||||
|
|
||||||||||||||||||||||||||||||||
|
|
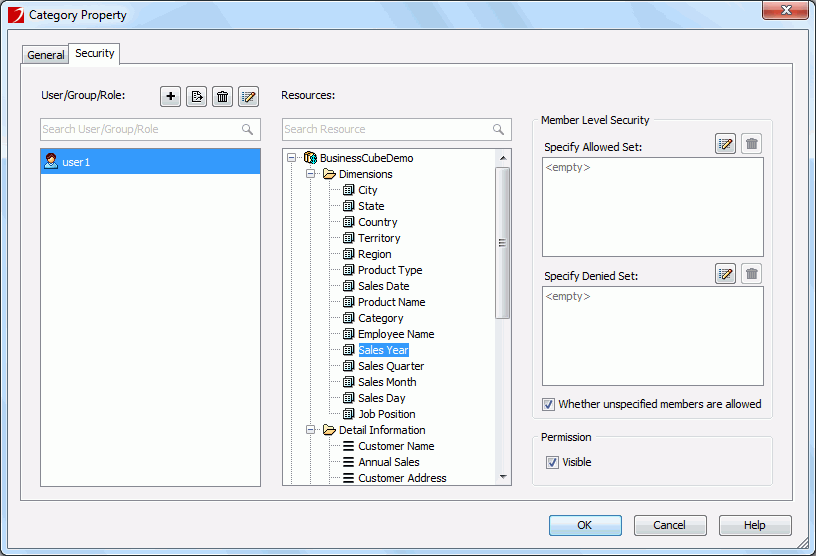
 to add users, roles, and groups manually or by importing from an XML file or from JReport Server.
To edit a user/role/group, select it and click  . In the corresponding edit dialog, edit it as required.
To delete a user/role/group that is not wanted, select it and click  .
.
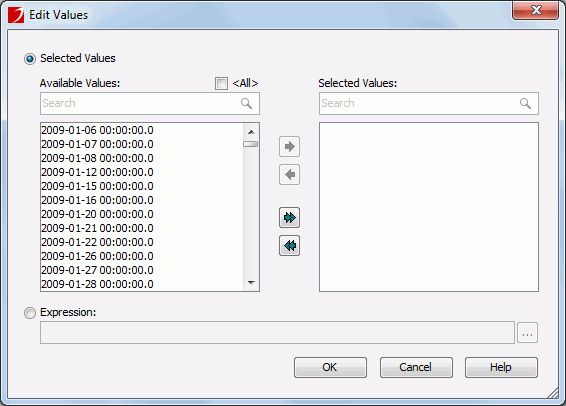
above the Specify Allowed Set or Specify Denied Set box. The Edit Values dialog is displayed. See the dialog.
If you would like all the possible members of the field to be selected, select <All>.
If you just want to select some of the members, leave <All> unchecked. Add them one by one by selecting one and then clicking  . You can make use of the quick search toolbar to search for the required members.
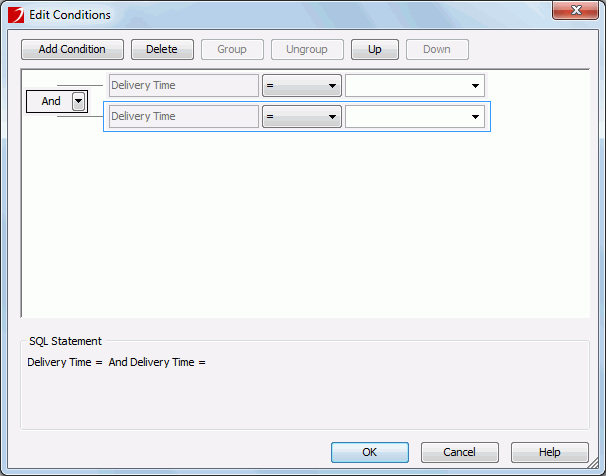
 to open the Edit Conditions dialog. See the dialog.
Click the Add Condition button to add a condition line. Choose the operator with which to compose the condition expression from the operator drop-down list. From the value drop-down list, specify the value of how to build the condition. You can also type in the value manually. Click Add Condition to add more condition lines and define the relationship between the condition lines.
To make some conditions grouped, select them and click the Group button, then the selected conditions will be added in one group and work as one line of filter expression. Conditions and groups together can be further grouped. To take any condition or group in a group out, select it and click Ungroup.
To adjust the priority of the conditions, select it and click the Up or Down button.
To delete a condition line, select it and click the Delete button.
See also Edit Business View Security dialog, Edit Values dialog and Edit Conditions dialog for addition information about options in the dialogs.