

Binding links to objects
You can bind links to labels, images, DBFields, formula fields, parameter fields, special fields, and data markers on charts of bar, bench, pie, line and area types. The link can either be a simple link or a conditional link. With conditional link, different targets can be loaded based on different conditions. However, conditional link is not supported on charts and independent labels that are not bound with a dataset.
To bind a simple link to an object:
- Right-click the object and click Link on the shortcut menu to display the Insert Link dialog.
- From the Link Type drop-down, select the target to which the object will be linked.
- When done, click OK to create the link.
To bind a conditional link to an object:
- Right-click the object and select Link from the shortcut menu to display the Insert Link dialog.
- Check the Conditional Link checkbox.
- Click the button
 to open the Edit Conditions dialog to define a condition using either simple expressions or complex expressions according to your requirements.
The newly added condition will then be displayed and highlighted in the conditions box in the Insert Link dialog.
- From the Link Type drop-down, select the target to which the object will be linked under this condition.
- Repeat the above steps to add more conditions and define the link target for each condition.
To edit a condition, select the condition in the Condition box, then click  . In the Edit Conditions dialog, edit the expressions as required.
To remove a condition and the corresponding format, select the condition in the Condition box and click  .
.
To adjust the priority of a condition, select the condition in the Condition box and then click  or
or  .
.
- When done, click OK to finish defining the conditional link.
For an illustrated example, see Example of binding a conditional link. See also Insert Link dialog for additional help about options in the dialog.
Once a link is added to an object, you can further edit it or remove it.
- To edit a link, right-click the object and select Edit Link from the shortcut menu. In the Edit Link dialog, edit the link according to your requirement.
- To remove a link from an object, right-click the object and click Remove Link on the shortcut menu. In the warning message dialog, click Yes to confirm the removal.
Linking a report to another report
A report can be linked to another report, after which the trigger object in the primary report can be clicked in order to jump to the linked report to obtain information about the trigger object.
- In the Insert Link dialog, select Report as the link type. See the dialog.
- Click the Browse button beside the Report text field to specify the target web report you want as the linked report.
- Specifies the window or frame in which to load the linked report from the Target drop-down list.
- Click the Advanced button to displays the advanced settings.
- In the Conditions tab, click
 above the Components box to specify which components in the linked report will be interlinked with the primary report.
- Select a component in the Components box, then specify the link relationship for the selected target component in the Field Conditions box as follow:
- Click the button
 above the Field Conditions box, then a new condition row will be added.
- Select a field from the drop-down list in the Fields(Primary) column.
- Choose an operator from the drop-down list in the OP column. The operator can be "=", "<>", "<", ">", "<=", ">=", or "IN".
- Specify the field of the linked report from the drop-down list in the Fields(LinkedReport) column. All fields in the linked report of the same value type as the selected primary report field will be available.
- If necessary, you can specify more link conditions by clicking the button
 and then specifying the primary report field, the operator, and the corresponding field in the linked report. Note that the relationship among these link conditions is AND, which means that JReport will fetch linked report data which meets all of the conditions.
- Repeat the above steps to set link conditions for other target components.
- From the Default Linked Component drop-down list, select which component in the linked report will be linked with the primary report by default. Then, when the primary report is opened in HTML, PDF or Excel format, or in Web Report Studio, the page where the data that meet the predefined condition in the specified component in the linked report will be displayed by default after you click the link.
- If the linked report uses parameters, go to the Parameters tab, the Target Report Parameters box lists the parameters of the linked report. You can assign fields of the primary report to the parameters. Then, when running the linked report from the link, the field values of the primary report will be assigned to the parameters automatically.
- Click OK to apply the settings.
Then, when the primary report is run in Web Report Studio, or in HTML, PDF or Excel format with Run Linked Report being selected, the link will be enabled, and when you click the trigger object in the primary report, you will find that the linked report is displayed according to the specified link conditions.
If the linked report is opened in the same frame as the primary report in Web Report Studio, you can click  on the toolbar to go back to the primary report. Click
  next to
  and you will get a drop-down list which lists the original report and the linked targets you have just visited within the link chain. The item checked on the drop-down list is the currently opened page. Select an unchecked item and you will be directed to that target.
Notes:
- When linking reports, you need to avoid link loops. For example, if you have linked report A to report B, then you cannot link report B back to report A again.
- The conditions specified in the Condition tab are used for setting up the searching criteria between the two linked reports, which means after you click the trigger object in the primary report, the pages containing the data that meet the conditions in the linked report will be displayed. However, when running the primary report in Web Report Studio or JDashboard, the conditions are used for filtering, that is, only the data that meet the conditions in the linked report will be displayed.
- For web reports created in JReport Designer which contain links, if the trigger objects of the links happen to be in some hierarchies (which means you can also perform the go-down action on the objects by single click), you can click the trigger objects to directly open the links in Web Report Studio only when the click priority of the link action is specified to be the highest at report design time. If the priority of the go-down action is specified the highest, you can click the trigger objects to open the links only when you have reached the lowest level of the hierarchies by going down on the objects first.
Example of binding a conditional link
This section provides an example to show the usage of conditional link and dynamic field.
- Run the report Link.wls located in the
/SampleReports folder.
- Click Edit Mode on the toolbar.
- We will define a link on the table of the report. Right-click on a Product Name value and then select Link from the shortcut menu.
- In the Insert Link dialog, check the Conditional Link checkbox.
- Click
 to define a condition in the Edit Conditions dialog as follows.
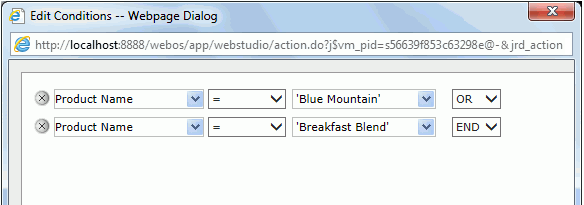
- We will make the field linked to a URL target based on the condition. From the Link Type drop-down list, select URL. In the Confirm dialog, click Yes.
- In the Hyperlink text box, type in http://www.google.com/search?q= and then click the Add Dynamic Field button to insert the field Product Name at the end of the URL.
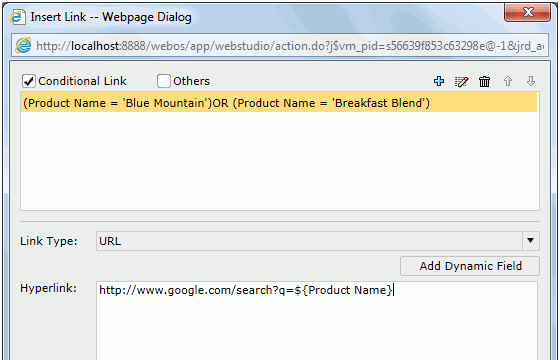
- For the product names other than Blue Mountain and Breakfast Blend, we will make them linked to an e-mail target. Check the Others checkbox. A condition named Others will be created.
- From the Link Type drop-down list, select E-mail. In the Confirm dialog, click Yes.
- In the Hyperlink text box, type in @example.com and then click the Add Dynamic Field button to insert the field Product Name right ahead of @.
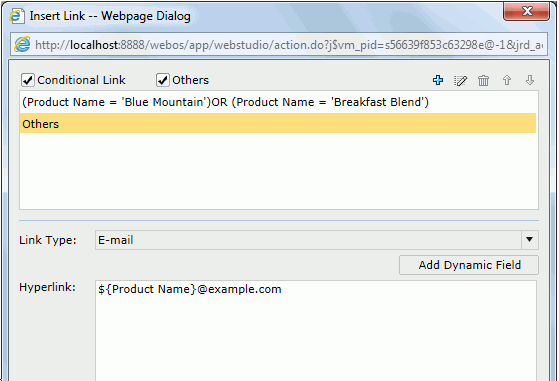
- Click OK in the Insert Link dialog.
- We will click the product names in the table to view the link result. Click Blue Mountain and a Google search result page with the key text Blue Mountain will be displayed.
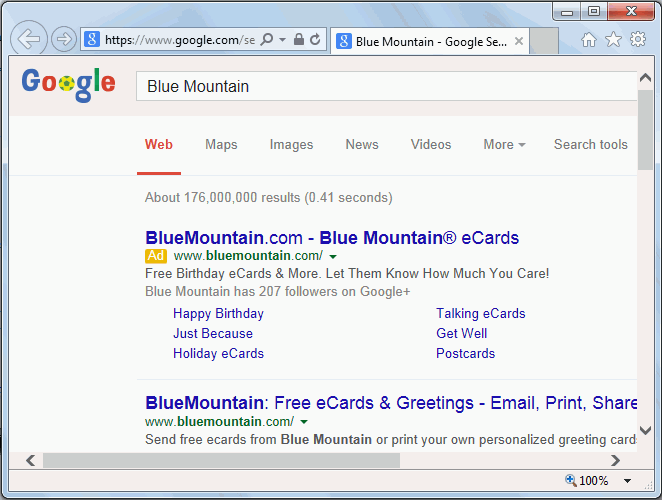
- Click Breakfast Blend and a Google search result page with the key text Breakfast Blend will be displayed.
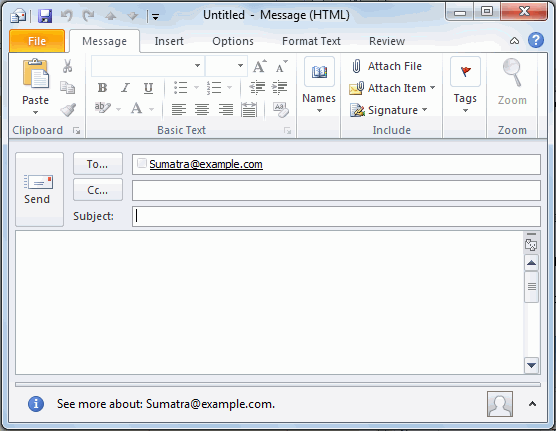
- Navigate to the second page of the table, click Sumatra and an e-mail is displayed as follows:


 to open the Edit Conditions dialog to define a condition using either simple expressions or complex expressions according to your requirements.
 . In the Edit Conditions dialog, edit the expressions as required.
 .
. or
or  .
. above the Components box to specify which components in the linked report will be interlinked with the primary report.
  above the Field Conditions box, then a new condition row will be added.
 and then specifying the primary report field, the operator, and the corresponding field in the linked report. Note that the relationship among these link conditions is AND, which means that JReport will fetch linked report data which meets all of the conditions.
 on the toolbar to go back to the primary report. Click
  next to
  and you will get a drop-down list which lists the original report and the linked targets you have just visited within the link chain. The item checked on the drop-down list is the currently opened page. Select an unchecked item and you will be directed to that target.
 to define a condition in the Edit Conditions dialog as follows.


